Planning a wedding can feel like an overwhelming task, especially when you’re trying to keep your budget in check. If you’re dreaming of a breathtaking venue that captures the essence of your special day but are worried about costs, you’re not alone. Many couples want to create a magical atmosphere without breaking the bank. That’s where DIY ceiling draping comes in! This post is designed to help you transform your venue using budget-friendly hacks that don’t skimp on style.
If you’re a couple looking to make your wedding day unique and memorable, this guide is for you. You might love the idea of stunning decorations but fret over the expense of hiring professionals. With these DIY ceiling draping techniques, you can add personal touches that reflect your personality and style. From whimsical fabric swags to elegant chandeliers, you’ll find the perfect inspiration to create that stunning wedding look you’ve always wanted, all on a budget!
In this post, I’ve gathered 12 incredible DIY ceiling draping hacks that are not only easy to execute but also visually stunning. Each idea is designed to be step-by-step so you can follow along, whether you’re a crafting novice or a seasoned DIYer. Get ready to take your wedding decor to the next level without the hefty price tag!
Key Takeaways
– Transform your venue: Learn how to create a magical atmosphere with simple DIY ceiling draping techniques that elevate any space.
– Budget-friendly options: Discover cost-effective materials that suit various wedding themes, making it possible to achieve your dream decor without overspending.
– Step-by-step guidance: Each hack includes clear instructions, ensuring you can confidently bring your ideas to life, regardless of your crafting skills.
– Personalize your decor: Use these hacks to showcase your unique style, incorporating colors and materials that represent you as a couple.
– Versatile designs: Explore multiple options from classic canopies to boho macramé, giving you the flexibility to find the perfect fit for your wedding vision.
Contents
- 1. The Classic Draped Canopy
- 2. Colorful Fabric Swags
- 3. Floating Lanterns and Drapes
- 4. Rustic Wooden Beams with Draping
- 5. Tulle and Fairy Light Overload
- 6. Simple Sheer Panels
- 7. Geometric Fabric Shapes
- 8. Boho Macramé and Draping
- 9. Elegant Chandelier Draping
- 10. DIY Flower and Fabric Combo
- 11. Layered Fabric and Natural Elements
- 12. Vintage Lace Draping
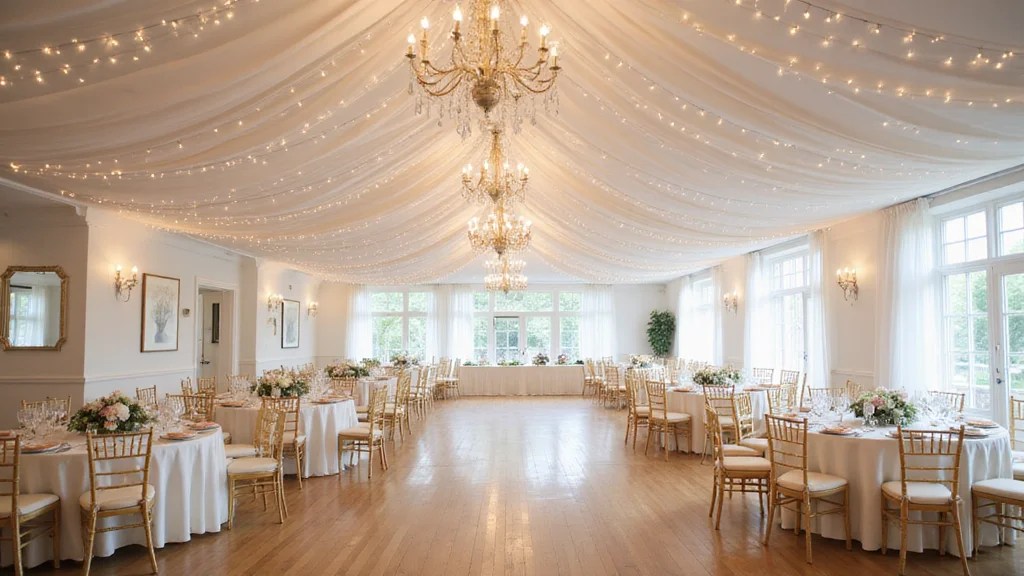
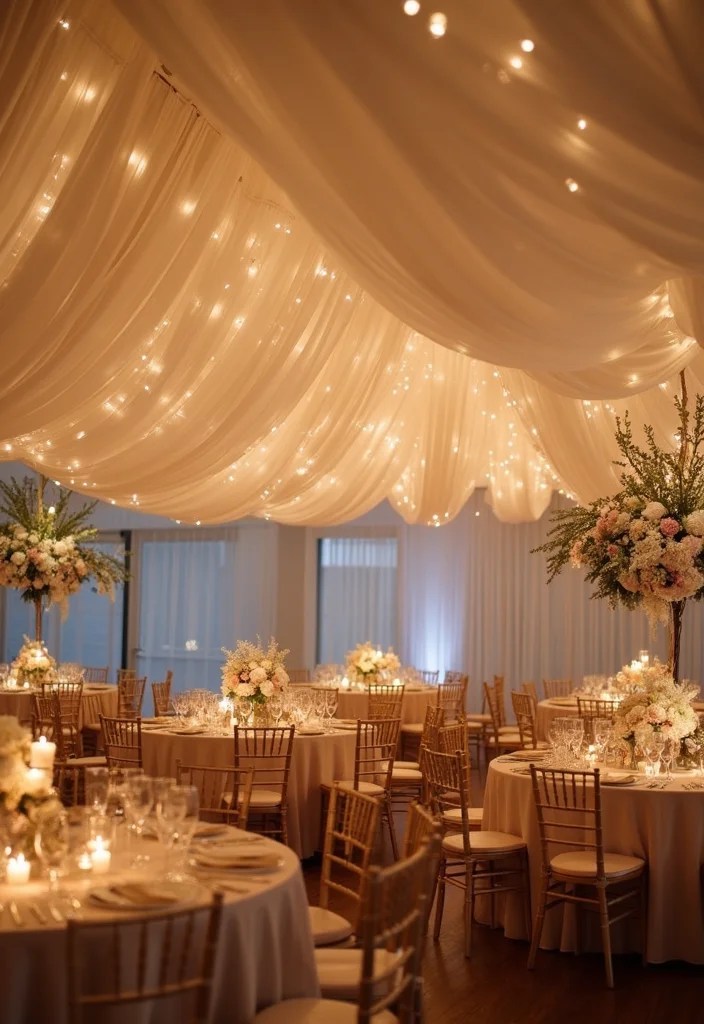
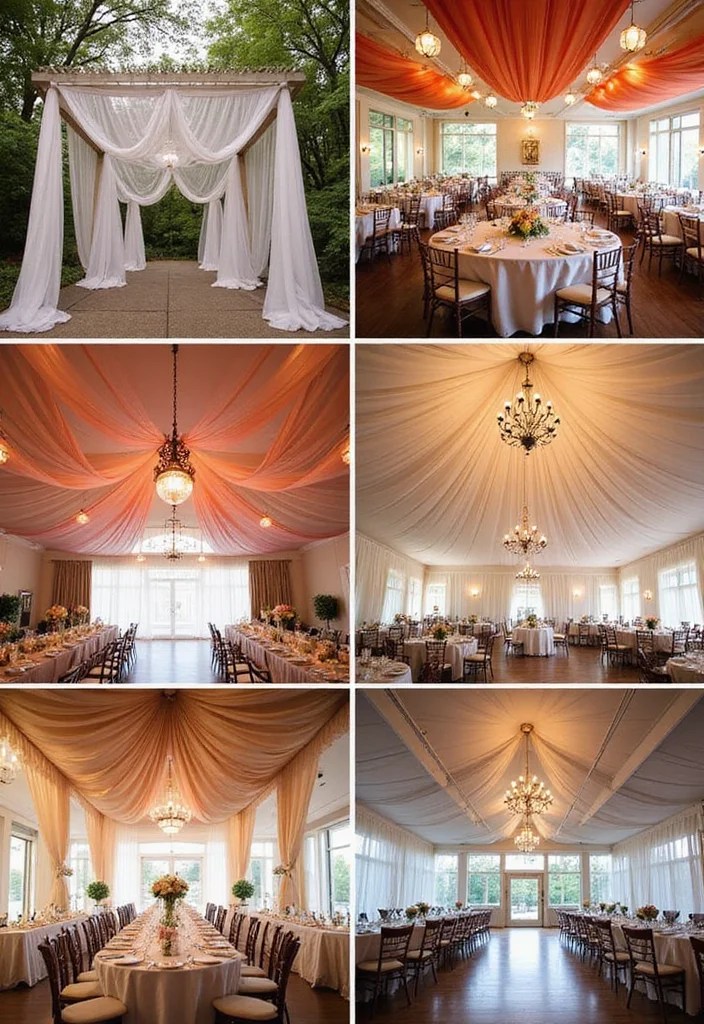
1. The Classic Draped Canopy
A classic draped canopy can transform your venue into a whimsical retreat. This design creates a soft, flowing effect from the ceiling, often gracing the head table or dance floor with its elegance. The charm lies in its versatility; sheer fabrics provide a light ambiance, while heavier materials offer a dramatic flair. Think flowing tulle or satin to elevate your space effortlessly.
To implement this look, choose a fabric that aligns with your wedding theme. Measure your area to decide how many panels you’ll need. Secure the drapes with hooks and let them cascade down, adding fairy lights or flowers for extra enchantment.
Tips:
– Pair sheer tulle with heavier satin for texture.
– Incorporate greenery at focal points for a natural touch.
– Ensure drapes reach the ground for fullness.
This simple hack can transform your venue quickly, creating a magical atmosphere reminiscent of fairy tales!
Editor’s Choice
2. Colorful Fabric Swags

For a bold statement, colorful fabric swags can do wonders. This DIY project allows you to play with hues that resonate with your wedding palette, creating a stunning visual impact overhead. Strategically draping vibrant fabrics across the ceiling draws the eye upward and adds depth to your venue. Consider mixing silk and chiffon for playful texture.
Select three or four complementary colors, cutting your fabric into long strips before securely attaching them to the ceiling. Create gentle waves that cascade down for added interest and vibrancy.
Tips:
– Use contrasting colors for a striking appearance.
– Mix textured fabrics like lace for an interesting twist.
– Hang lanterns among the swags to enhance the look.
This cheerful design will surely set a joyful tone for your special day!
Fun fact: Using three or four complementary colors in silk and chiffon swags for DIY ceiling draping creates a dramatic ceiling cue—audiences often perceive the space as 20-30% larger. Start by cutting fabric into long strips and securing them with gentle tension.
Editor’s Choice
📹 Related Video: How to Add A Valance to Your Backdrop Using Sequin Fabric
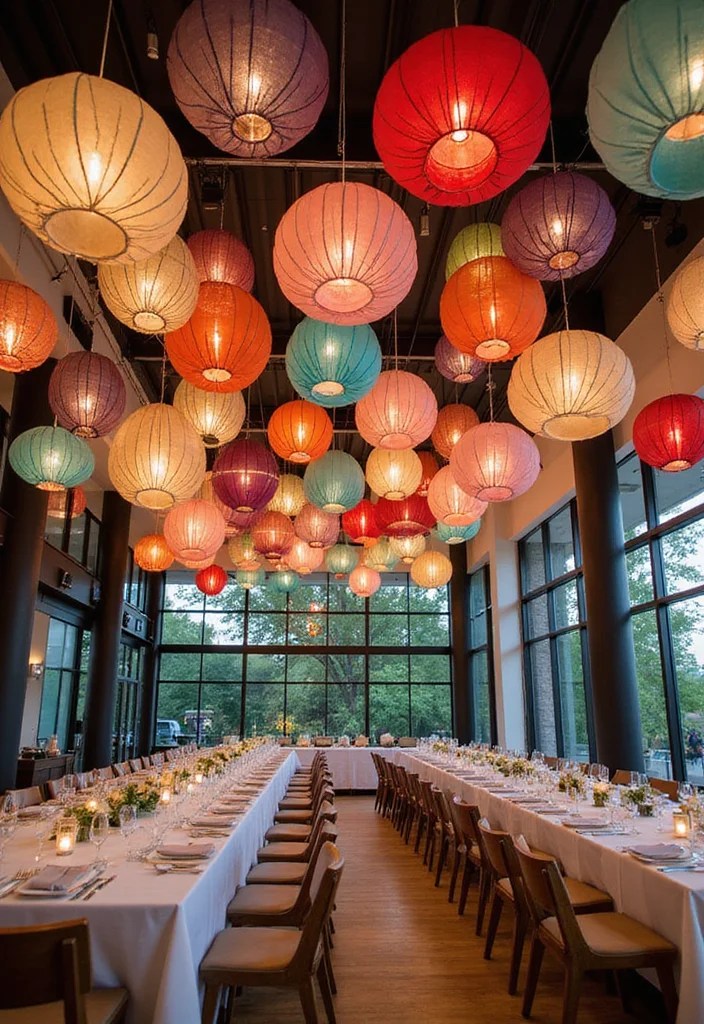
3. Floating Lanterns and Drapes
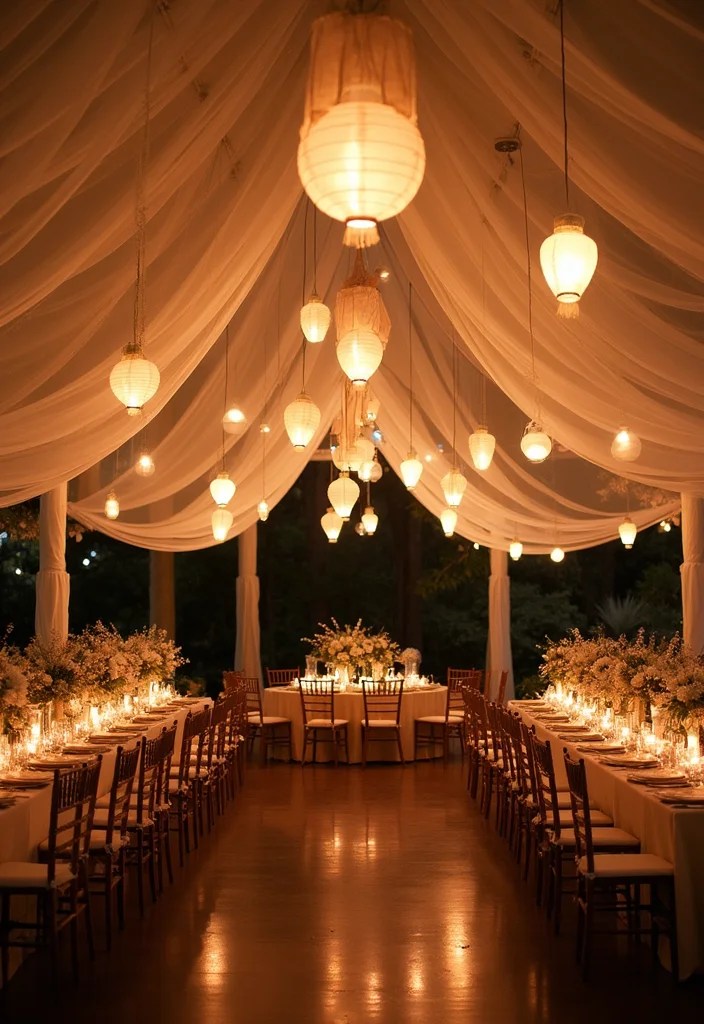
Turn your ceiling into a celestial night sky with floating lanterns and fabric draping. This captivating decor brings a touch of magic to your wedding, creating an enchanting atmosphere. Start by draping light and airy fabric to keep the space feeling open. Space out lanterns or fairy lights among the fabric for that sparkling night sky effect.
Consider using paper lanterns of various sizes and colors, hanging them at different heights for depth. This will add intrigue and warmth to your celebration.
Tips:
– Opt for LED lights for a warm glow.
– Secure lanterns properly to prevent accidents.
– Add personal touches like photos hanging from the drapes.
This enchanting setup will make your guests feel like they’re dining under the stars!
DIY ceiling draping can turn any room into a magical night sky. Start with light, airy fabrics and hang paper lanterns at different heights, weaving in fairy lights for depth. It’s budget-friendly, visually stunning, and totally doable for your wedding.
Editor’s Choice
4. Rustic Wooden Beams with Draping
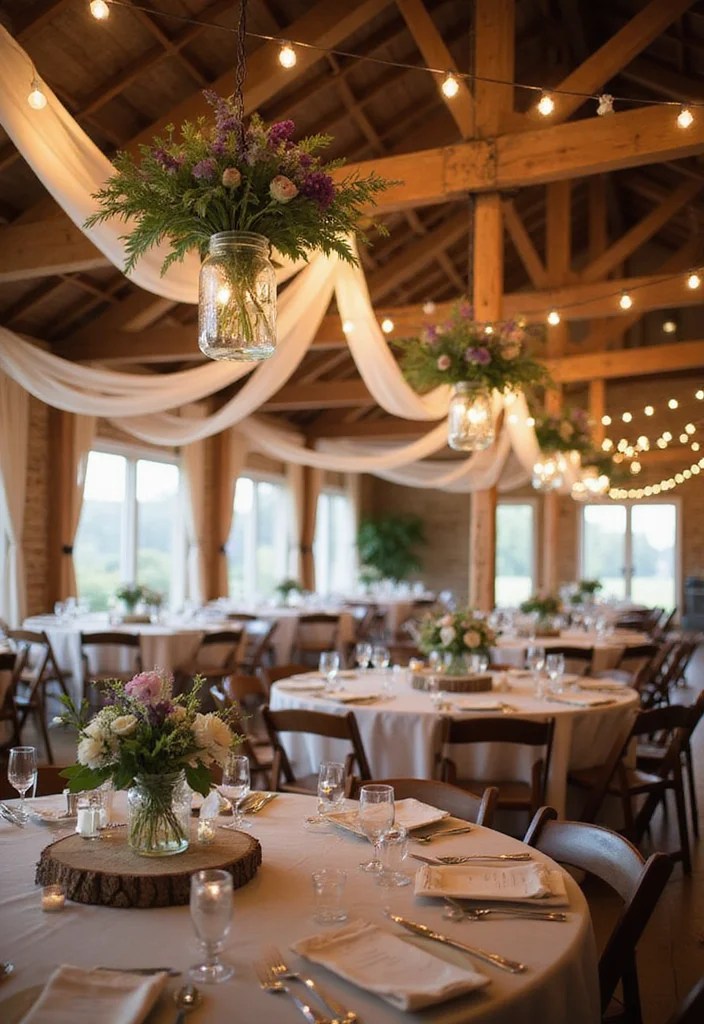
For a rustic or barn-style wedding, wooden beams paired with draping can create a charming aesthetic. This design combines natural elements with elegant fabric, inviting warmth into your space. Drape fabric over the beams, allowing it to cascade down toward your guests for a cozy feel.
Opt for neutral tones like ivory or light gray, which beautifully suit rustic themes. Adding accents like burlap or twine enhances the natural charm of the setup.
Tips:
– Hang mason jars filled with blooms from the beams.
– Use natural materials like greenery to complement the draping.
– Keep the draping loose for an effortless look.
This rustic touch evokes warmth and celebration, perfect for outdoor or barn weddings!
How To Install DIY Ceiling Draping
Tools You’ll Need:
– Measuring tape
– Scissors
– Fabric (in your choice of color and material)
– Ceiling hooks or adhesive hooks
– Ladder or step stool
– String lights (optional)
Step 1: Measure & Prep
Measure the area where you want to install your draping. Be sure to account for the height and width of your space. This helps determine how much fabric you’ll need. Use your measuring tape to get accurate measurements, and write them down. Prepare your fabric by cutting it into long strips or swags, depending on your design choice. ✔ Ensure all your fabric pieces are of equal length, or vary the lengths for a layered effect.
Step 2: Plan Your Design
Before you start hanging, visualize your draping design. Do you want a simple swag, a canopy effect, or something more intricate? Sketching out your design can make the installation process smoother. Think about how you want the fabric to flow and where to place lights, if using. ✔ You can create depth by varying the lengths of the fabric strips.
Step 3: Install Hooks
Using your ladder, mark the spots where you’ll place the hooks. Depending on your design, you might need multiple hooks along the ceiling. If using adhesive hooks, ensure they are rated for the weight of your fabric. ✔ Make sure you press them firmly against the ceiling for a secure hold.
Step 4: Hang Your Fabric
Start hanging your fabric from one end, attaching it to the hooks you’ve installed. For a simple swag look, allow the fabric to fall naturally. If you want a more defined shape, gather the fabric at points and secure it. ✔ Use fabric clips or tie the fabric to hooks for a clean finish.
Step 5: Add Lights (Optional)
If you want to enhance your ceiling draping, consider wrapping string lights around the fabric. This adds a magical glow and creates a romantic atmosphere. Start from one end of the drape and wrap the lights along the fabric, securing them with small clips if needed. ✔ Use battery-operated lights for convenience if electrical outlets are not available.
Step 6: Final Touches
Step back and assess your work. Adjust any fabric that looks uneven or needs more volume. If you have layered drapes, play around with the positioning until you are satisfied. Consider adding decorative elements like faux flowers or ribbons for a personal touch. ✔ Make sure everything is secure and looks balanced.
⏱ Time: ~2-4 hours | 💡 Tip: Have a friend help you! It can make hanging the fabric easier and more fun.
Creating a stunning ceiling drape for your wedding doesn’t have to be complicated or costly. Following these steps will lead to an elegant look that enhances your special day without breaking the bank. Enjoy the process and make it personal with colors and textures that reflect your style!
5. Tulle and Fairy Light Overload
Nothing embodies romance quite like tulle and fairy lights. This dreamy combination transforms any venue into a magical escape. Light and airy, tulle draping creates a whimsical atmosphere perfect for weddings. Gather tulle in your desired color, cutting it into strips to let it flow from the ceiling to the floor.
Weave fairy lights through the tulle for a soft, glowing ambiance. The lights will accentuate the delicate layers of fabric, bringing your vision to life beautifully.
Tips:
– Use battery-operated lights for easy placement.
– Layer different tulle colors for depth.
– Create focal points over key areas like the cake table.
This enchanting decor will leave your guests in awe, feeling the romance in the air!
6. Simple Sheer Panels
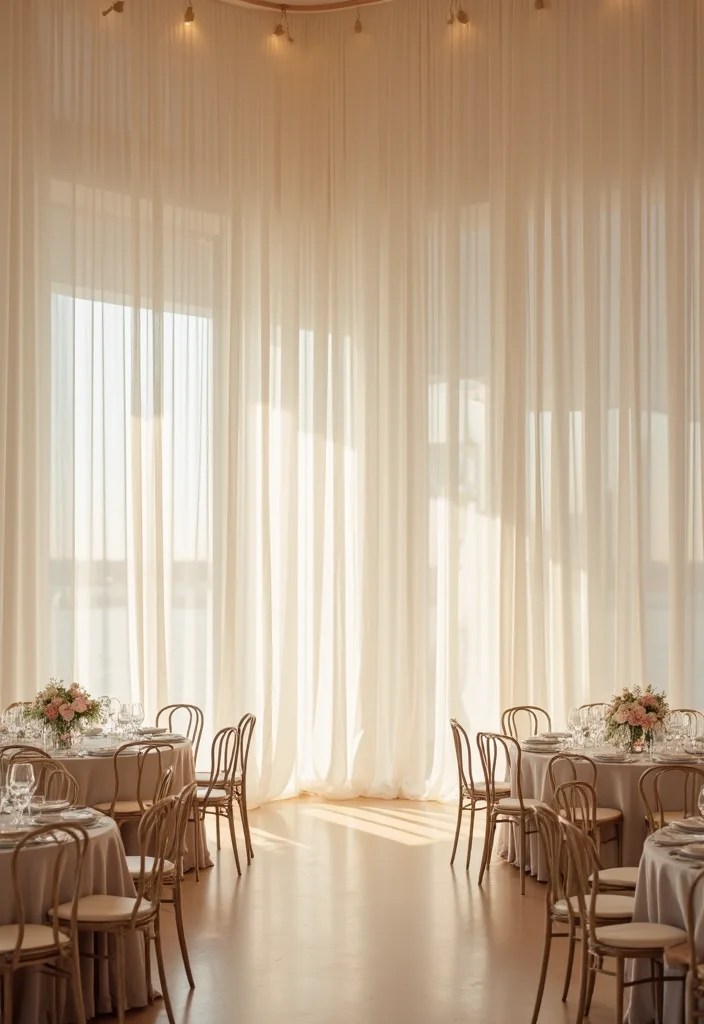
Sometimes, less truly is more, and sheer panels can create stunning effects without overwhelming the space. This choice adds sophistication to any wedding venue while keeping it beautifully minimalist. Select a light, flowing fabric like organza, hanging panels from the ceiling to create a soft backdrop.
Use a small amount of fabric for a delicate look or multiple panels for fullness. Tie them back with beautiful ribbons or florals for an added decorative touch.
Tips:
– Keep the color palette light for a more ethereal feel.
– Experiment with spacing for unique designs.
– Use additional lighting to highlight the sheer effect.
This setup is perfect for a minimalistic or elegant wedding, ensuring that your decor remains refined and uncluttered.
You might also like
10 Stunning Kitchen Countertop Materials That Will Instantly Elevate Your Space!
12 Stunning Low Maintenance Flowers Perfect for Urban Balconies (Transform Your Space!)
7. Geometric Fabric Shapes
For modern design lovers, geometric shapes add a unique twist to your ceiling draping. This DIY hack allows you to create striking fabric shapes that are both playful and artistic. Cut your fabric into various geometric forms like triangles or hexagons, attaching them to the ceiling in a creative pattern.
Mix fabric colors and textures for a contemporary vibe, and consider using LED strip lights to highlight the shapes, contributing to a fun atmosphere.
Tips:
– Vary the sizes of shapes for added interest.
– Choose bold colors for a striking contrast.
– Pair with modern table decor for a cohesive theme.
This unique approach is perfect for those looking to break away from traditional wedding decor!
8. Boho Macramé and Draping

For a bohemian feel, blending macramé with fabric draping creates a stunning, free-spirited atmosphere. This DIY hack introduces natural texture and artistry, perfect for incorporating boho elements into your wedding. Start by selecting a macramé piece as a focal point, hanging it centrally, then draping fabric around it in flowing layers.
Choose soft, earthy tones for the fabric to enhance the bohemian vibe, and consider adding feathers or dried flowers to accentuate the natural look.
Tips:
– Incorporate natural materials like wood for a cohesive theme.
– Use varying fabric lengths for dynamic visuals.
– Create a cozy seating area with cushions beneath your installation.
This earthy design will transport your guests to a dreamy atmosphere, making it perfect for a boho wedding!
Fact: Blending macramé with fabric draping adds natural texture and can cut decor costs by up to 30% on a DIY wedding. Start with a central macramé focal piece, then layer flowing fabric in soft, earthy tones. Add feathers or dried flowers to elevate the boho look.
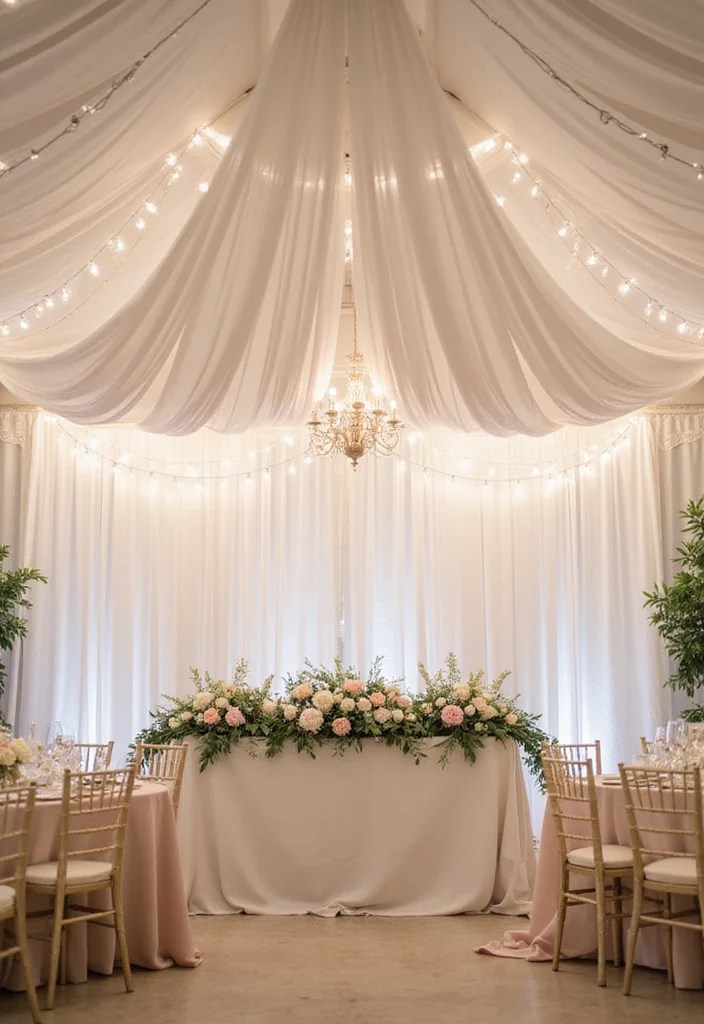
9. Elegant Chandelier Draping
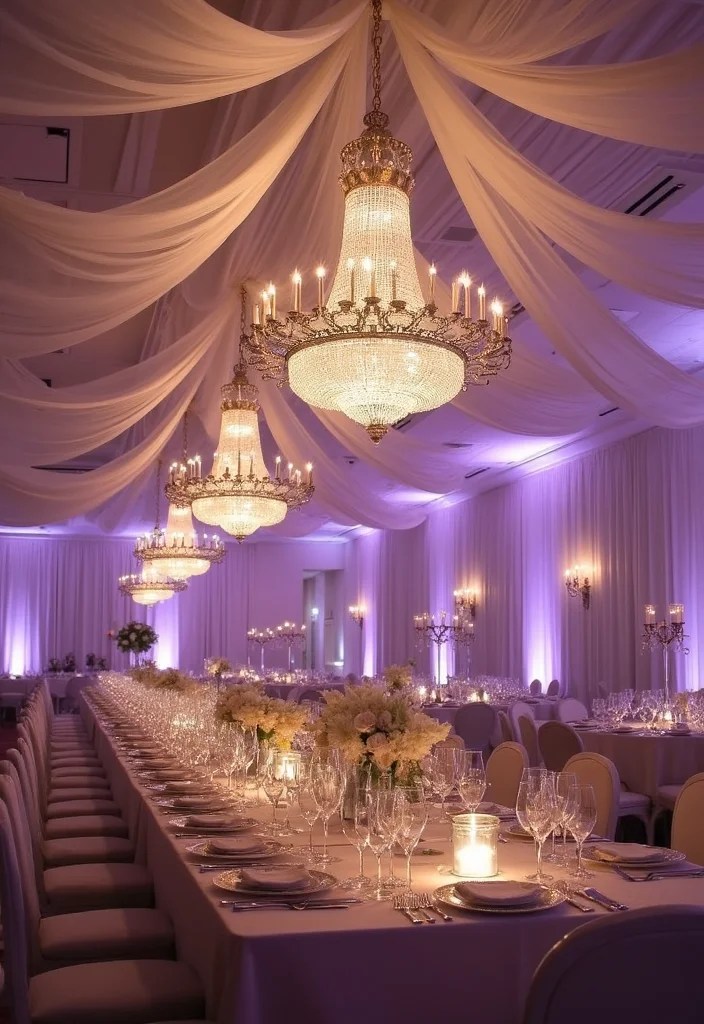
Elevate your ceiling draping by incorporating chandeliers into your design. This elegant hack adds a luxurious touch that impresses guests while creating a stunning focal point. Choose a chandelier that complements your decor, whether traditional or modern, and suspend it from the ceiling.
Use flowing fabric draping that cascades down from the chandelier, creating an opulent effect. Sheer fabric works beautifully, allowing the chandelier’s light to shine through.
Tips:
– Consider smaller chandeliers or crystal accents for added glamour.
– Mix floral arrangements with the draping for romance.
– Ensure the chandelier is securely fastened and at a safe height.
This sophisticated design adds glamour to your wedding, making it feel truly special!
Editor’s Choice
10. DIY Flower and Fabric Combo
Combining flowers with your ceiling draping creates a stunning installation that feels both romantic and fresh. This DIY hack beautifully marries fabric with the vibrancy of flowers, enhancing your wedding ambiance. Choose a fabric that complements your flower colors and plan to create focal points with floral arrangements attached to the draping.
Secure the fabric to the ceiling, letting it flow down while incorporating clusters of flowers along the way. Fresh blooms or artificial ones can both work, depending on your budget.
Tips:
– Select seasonal flowers to keep costs down.
– Experiment with varying heights for a lush look.
– Add greenery to enhance fullness in the draping.
This cheerful design will brighten your venue, creating a joyful atmosphere filled with love and celebration!
You Might Also Like
10 Stunning Cool Blue Aesthetic Rooms That Will Refresh Your Space Instantly!
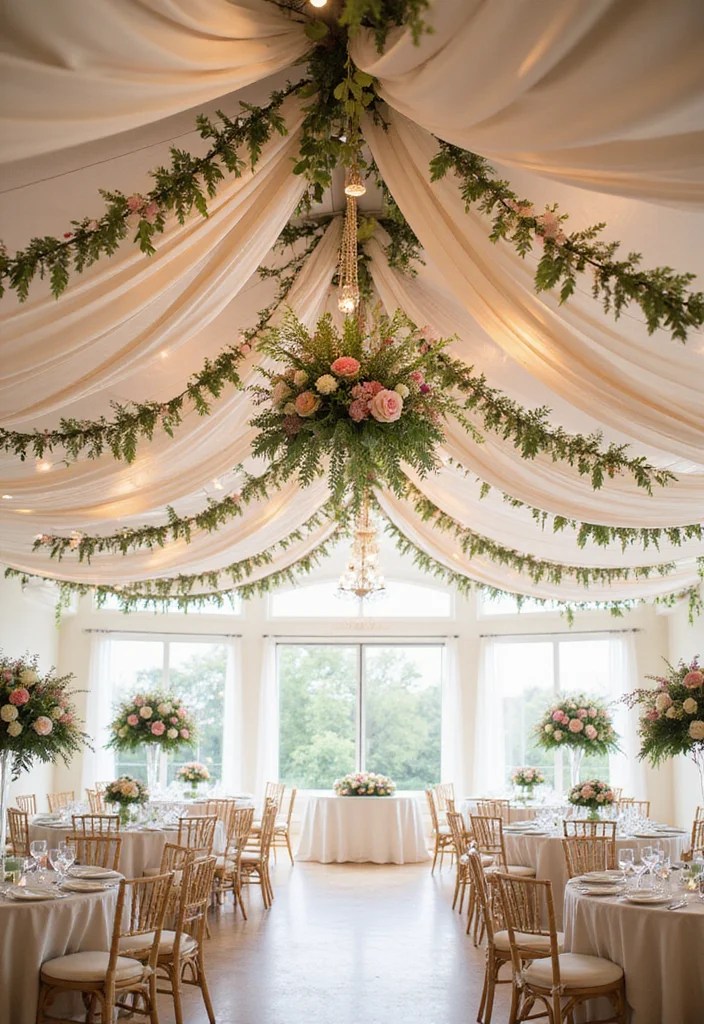
11. Layered Fabric and Natural Elements

For a textured look, layering fabric with natural elements like branches or vines creates an organic and fresh feel. This unique approach blends elegance with nature, ideal for outdoor or woodland weddings. Choose fabrics like linen or canvas, cutting them into varying lengths.
Drape them from the ceiling while weaving branches or vines through the fabric for added depth and interest. This technique ties in the beauty of the surrounding environment beautifully.
Tips:
– Use greenery that resonates with your wedding color palette.
– Opt for fabric colors that complement the natural elements.
– Ensure branches are secured to prevent mishaps.
This earthy design brings the outdoors inside, creating a serene atmosphere for your celebration!
12. Vintage Lace Draping
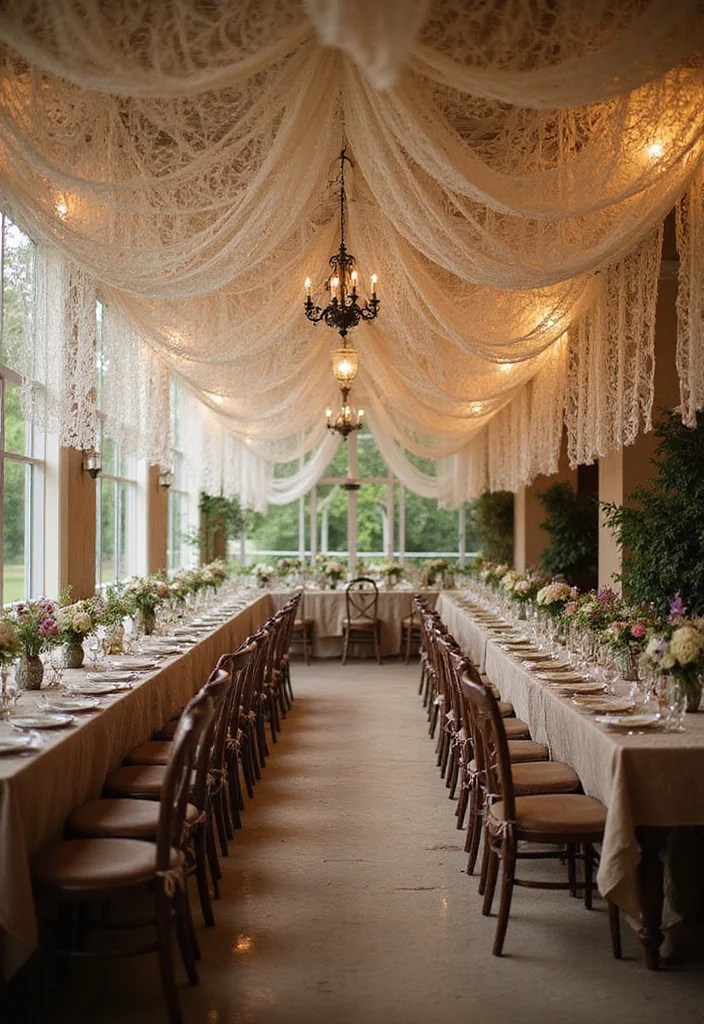
If vintage aesthetics appeal to you, lace draping adds timeless elegance to your wedding decor. This beautiful fabric brings texture and a romantic vibe, perfect for classic or vintage-themed weddings. Select vintage lace or lace-trimmed fabric, hanging it from the ceiling to flow down in delicate waves.
The intricate lace patterns catch the light beautifully, creating a warm and inviting atmosphere. Pair it with soft lighting for an added romantic effect.
Tips:
– Combine with vintage furniture to enhance the theme.
– Consider small floral arrangements to create cohesiveness.
– Use pastel or muted colors to maintain the vintage feel.
This enchanting touch fills your space with nostalgia and charm, making it ideal for a dreamy vintage wedding.
Conclusion
With these 12 creative DIY ceiling draping hacks, you’re well on your way to crafting a beautiful wedding ambiance that reflects your style without straining your budget. Each idea can be customized to fit your unique vision, whether you prefer the elegance of draped canopies, the vibrancy of colorful fabrics, or the charm of natural elements.
Don’t hesitate to mix and match these ideas for a truly personalized experience. Happy crafting, and may your wedding day be as magical as you’ve always dreamed!
Note: We aim to provide accurate product links, but some may occasionally expire or become unavailable. If this happens, please search directly on Amazon for the product or a suitable alternative.
This post contains Amazon affiliate links, meaning we may earn a small commission if you purchase through our links, at no extra cost to you.
Frequently Asked Questions
What is DIY ceiling draping and how can it help you achieve a stunning wedding look on a budget?
DIY ceiling draping is a budget-friendly way to transform a venue by suspending fabric to create a dreamy ceiling. It adds dimension and romance without breaking the bank.
Getting started: measure your space, choose lightweight fabrics like tulle or chiffon, and pick colors that match your theme. Plan lighting to enhance the drape—fairy lights or uplighting work beautifully. Start with a simple grid or a few focal points to maximize impact with minimal material. Use safe anchors and check venue guidelines before drilling or hanging anything. With careful planning, you can create a stunning wedding look using DIY ceiling draping on a budget.
Do you have a step-by-step guide for a DIY ceiling draping project on a budget?
Yes—here’s a step-by-step plan to pull off DIY ceiling draping on a budget.
Step 1: Measure the venue and decide on coverage (full ceiling, half, or focal points).
Step 2: Pick lightweight fabrics (tulle, chiffon) in colors that match your palette.
Step 3: Mark anchor points using removable hooks or venue-approved hardware.
Step 4: Create a simple grid or establish single drape lines to minimize fabric use.
Step 5: Hang fabric with transparent fishing line or clear threads; fluff and secure seams; adjust with a steamer to remove wrinkles.
Step 6: Add lighting (string lights or fairy lights) to enhance the effect and tie the look together.
What budget-friendly materials and where can I buy them for DIY ceiling draping?
For cost-effective DIY ceiling draping, gather budget-friendly materials like lightweight fabrics (tulle or chiffon), string lights for ambiance, and removable anchors. Source from online marketplaces, party supply stores, or discount fabric outlets. Quick kit list and sourcing tips:
– Fabric: 108” wide tulle or chiffon in your chosen colors.
– Lighting: battery-operated string lights or warm LED tapes.
– Anchors: removable ceiling hooks, ceiling clips, or venue-approved mounting solutions.
– Tools: scissors, measuring tape, ladder, and clear fishing line or nylon thread.
Buying tips: look for fabric remnants or clearance sections, borrow from friends, and plan purchases around sales or bundle deals to keep things budget-friendly.
How can I install ceiling draping safely and without damaging the venue or ceiling?
Safety first is the name of the game. Start by checking the venue’s rules and getting written permission for any hanging elements. Use lightweight fabrics to keep weight manageable and avoid overloading anchors. Choose removable or venue-approved mounting methods to prevent damage. Work with a partner, test anchors in a small area, and keep cables and lines neatly concealed to avoid trips. Always have a plan B in case you need to remove the draping quickly. By planning ahead, you can install beautiful DIY ceiling draping without risking the venue or ceiling.
What are the most common mistakes to avoid with DIY ceiling draping, and how can I troubleshoot them?
Common missteps include using heavy fabrics, underestimating weight, skipping a venue check, and failing to test the setup before the big day. To avoid these: 1) keep fabrics lightweight; 2) confirm anchor points and weight limits with venue staff; 3) do a mock setup a week ahead; 4) ensure even coverage and balance to prevent sagging; 5) hide hardware with fabric layers and use lighting to hide seams. If draping looks uneven, adjust tension gradually and re-fluff the fabric. With a little testing and a calm plan, you’ll have a polished, DIY ceiling draping that looks truly professional.
Related Topics
DIY ceiling draping
wedding decor
budget-friendly
step-by-step
event styling
easy hacks
vintage style
boho decor
beginner friendly
affordable elegance
seasonal decor
creative solutions

Leave a comment