(Surprise printable recipe)
And it’s easy to see why — people love that magical moment when a dish looks totally ordinary but reveals something unexpected, dramatic, and irresistibly delicious.
This guide brings you 10 viral-ready, budget-friendly party recipes designed to wow any crowd. Each dish costs under $15 per serving, requires simple tools, and needs less than 40 minutes of prep time — making them perfect for busy hosts who still want unforgettable food moments.
Whether you’re planning a cozy Christmas dinner, a holiday potluck, a family gathering, or a New Year’s Eve party, these recipes are your certified showstoppers. From surprise-inside appetizers to creative main courses, every dish is crafted to boost share-ability, aesthetic appeal, and pure “Wait—what?!” reactions.
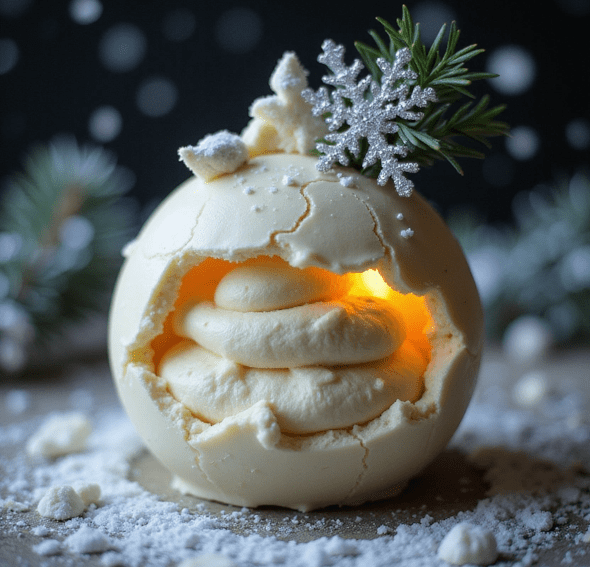
1. Snow Globe Soup (#snowglobe)

Serves 8 | Active time: 30 min | Total time: 1 hr (includes chilling) | Cost: ~$9
A delicate, shimmering consommé served inside a food-safe glass ornament. Guests shake it to create a silver snowstorm of edible glitter, then sip through the stopper. The floating carrot stars and subtle lychee “pop” add surprise and texture.
(Note: Use only ornaments labeled food-safe, borosilicate preferred. No craft ornaments.)
INGREDIENTS
For the consommé base
- 4 cups (1 L) tomato consommé
(Campbell’s low-sodium boxed or homemade – must be crystal clear) - 1 sheet unflavored gelatin (2.5 g)
- ½ tsp edible silver pearl dust (food-grade luster dust)
For the garnish
- 2 medium carrots, peeled
- 8 pieces lychee popping boba (1 per ornament) – optional but fun
- Pinch of smoked paprika (optional, for aroma)
Equipment (must be food-safe)
- 8 clear glass ball ornaments, 4” diameter (~100 ml capacity) with removable metal cap
- 8 silicone stoppers (size to fit ornament opening; wine-bottle pourers work)
- Small funnel (2–3 mm spout)
- Mini star cookie cutter (½”)
- Digital thermometer
- Fine-mesh sieve (optional, for extra clarity)
STEP-BY-STEP INSTRUCTIONS
1. PREP THE ORNAMENTS (5 min)
- Remove metal caps from all 8 glass ornaments.
- Wash ornaments + caps + silicone stoppers in hot soapy water, rinse well, air-dry.
- Keep caps off until assembly.
2. CLARIFY & STABILIZE THE CONSOMMÉ (10 min)
- Pour 4 cups consommé into a small saucepan.
- Heat over medium-low until 160°F / 71°C (just steaming, no simmer). Stir occasionally.
- While heating, bloom the gelatin: place 1 sheet in a bowl of cold water for 5 min until soft.
- Squeeze excess water from gelatin, whisk into hot consommé until fully dissolved (30 sec).
- Remove from heat. Cool to 100°F / 38°C (warm but not hot) – about 5 min. Stir in optional pinch of smoked paprika now.
3. CARROT STARS (5 min)
- Use a vegetable peeler to ribbon-peel carrots lengthwise into thin strips.
- Press mini star cutter through strips to punch out 24–32 stars (3–4 per ornament).
- Bring a small pot of water to a boil. Blanch stars for 30 seconds.
- Immediately plunge into ice water for 1 min to set color and crunch. Drain and pat dry.
4. ASSEMBLE THE ORNAMENTS (10 min)
Work in batches of 2–3 to keep liquid warm.
- Place small funnel in ornament opening.
- Pour ~½ cup (100 ml) warm consommé into each ornament, leaving ½” headspace.
- Add 1 lychee popping boba (it will sink then float).
- Sprinkle pinch (~1/16 tsp) silver pearl dust directly into liquid – it will swirl.
- Drop in 3–4 carrot stars.
- Insert silicone stopper firmly. Wipe any spills on glass.
- Repeat for all 8.
5. CHILL & SET (30 min minimum)
- Place ornaments upright in egg carton or muffin tin.
- Refrigerate 30 min until lightly set (consommé will jiggle slightly but hold shape). 2–4 hours MAX refrigerated.
SERVING
- Fill 8 small bowls with crushed ice. Nestle one ornament in each.
- Hand to guest with:
“Shake it like a snow globe, then sip through the stopper!” - The silver dust swirls, stars float, boba pops on the tongue.
PRO TIPS
- Make ahead: Assemble up to 6 hrs ahead; keep chilled.
- Vegetarian? Use vegetable consommé + agar (½ tsp powder bloomed in 2 Tbsp water).
- No popping boba? Substitute 1 small mozzarella pearl or edible flower petal.
- Extra sparkle: Dust ornament exterior with a tiny bit of pearl dust before serving (wipe if messy).
- Safety: Use only food-safe glass ornaments (check label). Never microwave.
Enjoy the magic!
2. Mistletoe Macarons That Kiss Back (#mistletoe)
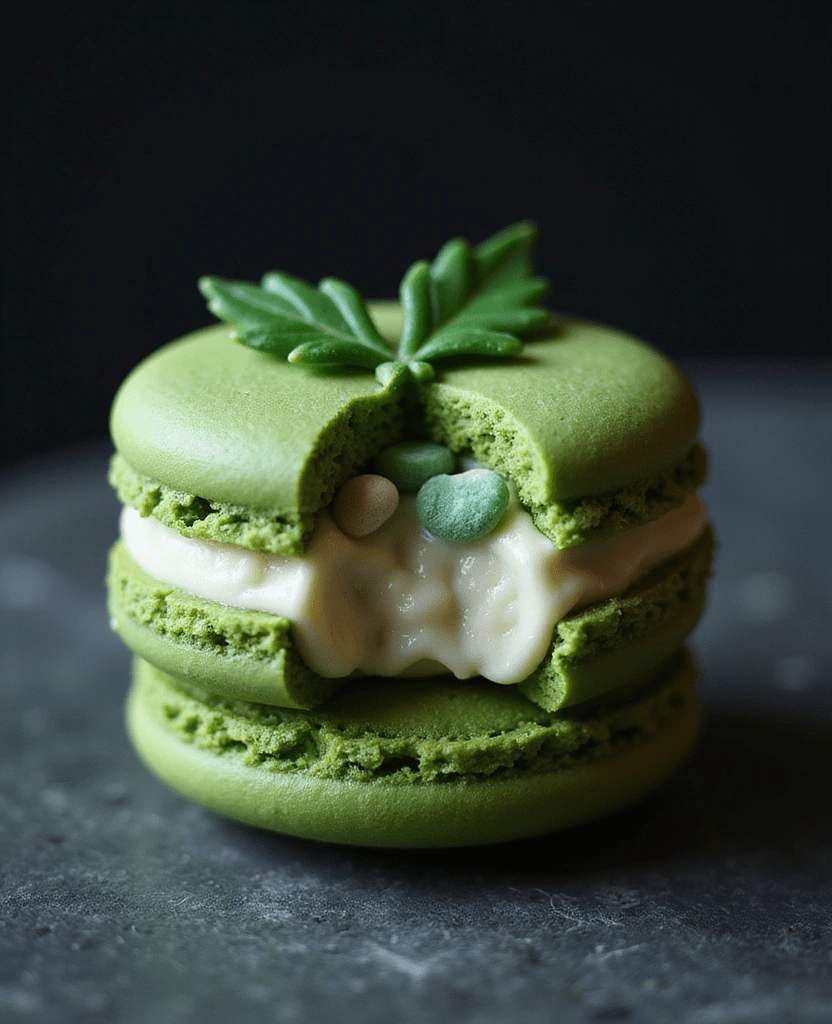
Makes 24 sandwiched macarons | Active time: 40 min | Total time: 1 hr 30 min (includes resting) | Cost: ~$12
Buttery matcha macaron shells hand-painted with mistletoe leaves, filled with white chocolate ganache loaded with mistletoe-flavored Pop Rocks. One bite = crackle, pop, and a festive “kiss” in your mouth!
INGREDIENTS
For the macaron shells
- 1 box macaron mix (170 g / 6 oz – any reputable brand like Jelife or Bob’s Red Mill)
- 1 tsp culinary-grade matcha powder (sifted)
- 2 large egg whites (60 g – room temp; included in most mixes)
- ¼ cup granulated sugar (if mix requires – check box)
For the mistletoe filling
- ½ cup (3 oz / 85 g) white chocolate chips or baking bar (chopped fine)
- 2 Tbsp heavy cream (or full-fat coconut milk for dairy-free)
- 2 Tbsp lime or watermelon Pop Rocks (green packet) + edible glitter
- 1 drop peppermint extract (optional, for extra “kiss”)
For decoration
- Edible green food marker (fine tip)
- Extra matcha powder for dusting (optional)
Equipment
- Piping bag + ½” round tip (#804 or #1A)
- 2 silicone macaron mats OR parchment paper + printed 1.5” circle template
- Small offset spatula
- Digital thermometer
- Fine-mesh sieve
STEP-BY-STET INSTRUCTIONS
1. PREP YOUR STATION (5 min)
- Preheat oven to 325°F / 165°C (conventional, not convection).
- Line 2 baking sheets with silicone macaron mats OR parchment + template.
- Fit piping bag with round tip. Set aside.
- Sift matcha powder twice to remove lumps.
2. MAKE MATCHA MACARON SHELLS (15 min)
- Follow box instructions exactly, but add 1 tsp sifted matcha with the almond flour step.
- Whip meringue to stiff, glossy peaks (bird-beak shape on whisk).
- Fold (macaronage) until batter flows like lava: lifts in a ribbon, disappears in 10 sec.
- Pipe 1.5” rounds (¾ full) onto mats, 1” apart.
- Tap sheets firmly on counter 3–5 times to release air bubbles.
- Rest 30 min at room temp until tops are dry to touch (no stickiness).
3. BAKE & COOL (12 min + 15 min)
- Bake 1 sheet at a time, middle rack, 12 min.
- Shells should rise with “feet,” tops smooth, no browning.
- Cool on sheet 2 min, then transfer to wire rack.
- Repeat with second sheet.
4. DRAW MISTLETOE LEAVES (10 min)
- Once shells are completely cool, flip half (24 bottoms).
- Use green edible marker to draw 2–3 simple mistletoe leaves + tiny berries on each top shell.
- Template: two angled ovals + 3 dots. Keep light-handed.
- Let ink dry 2 min. Dust lightly with matcha for shimmer (optional).
5. MAKE POP ROCKS FILLING (5 min)
- Place chopped white chocolate in heatproof bowl.
- Heat cream to just boiling (microwave 20-sec bursts).
- Pour over chocolate; let sit 1 min, then stir until silky.
- Cool to exactly 90°F / 32°C (body temp) – use thermometer.
- Fold in 2 Tbsp Pop Rocks + optional peppermint drop.
- Work quickly; filling sets fast.
6. ASSEMBLE & CHILL (10 min)
- Pipe 1 level tsp filling onto flat side of unmarked shells.
- Gently sandwich with decorated top shell (twist slightly to secure).
- Place macarons in airtight container; chill 10 min to set ganache.
- Pop Rocks stay crisp up to 4 hrs at room temp after this.
SERVING
- Serve on a platter dusted with matcha “snow.”
- Instruct guests: “Bite slowly – wait for the kiss!”
- The crackle hits 2 seconds after the matcha shell dissolves.
PRO TIPS
- Temperature is key: White chocolate above 95°F melts Pop Rocks. Below 85°F, it seizes.
- Make ahead: Bake shells 1 day ahead; store airtight. Fill same day.
- No mistletoe Pop Rocks? Use strawberry or watermelon + green food coloring in ganache.
- Vegan swap: Use vegan white chocolate + coconut cream; agar-based macaron mix.
- Storage: Filled macarons last 2 days in fridge (Pop Rocks soften after 24 hrs).
Merry crackling!
3. Christmas Tree Pull-Apart Bread… That’s Actually a Cake (#tree)
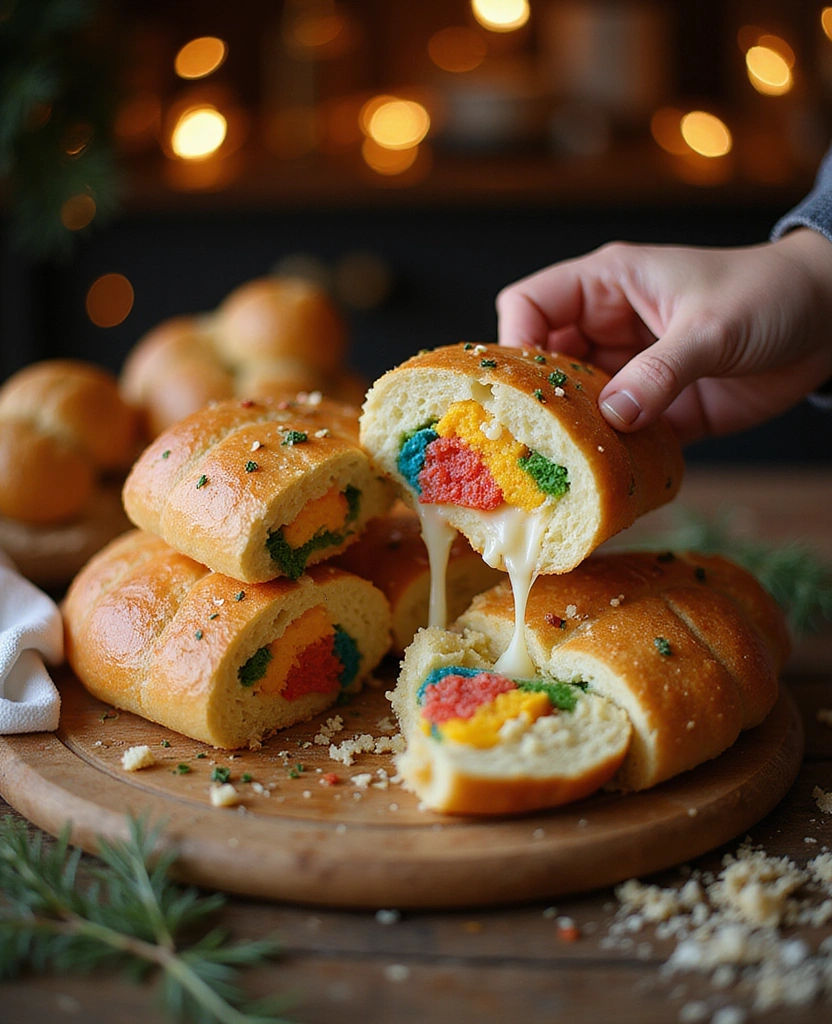
Serves 10 | Active time: 35 min | Total time: 1 hr (includes baking) | Cost: ~$14
A golden, cheesy garlic bread Christmas tree that smells savory and irresistible. Guests tear off a “branch” expecting pizza-bread bliss — then BOOM: vibrant rainbow cake and creamy frosting burst out. The ultimate sweet-savory prank!
INGREDIENTS
For the pull-apart tree
- 2 cans (13.8 oz each) refrigerated pizza dough (Pillsbury or store brand)
- 1 tsp spirulina powder (for natural green tint) – or 6 drops green food gel
- 1 sheet rainbow layer cake (9×13” store-bought or from box mix, cooled)
- 1 cup shredded low-moisture mozzarella (100 g)
- ½ cup (1 stick) unsalted butter, melted
- 3 cloves garlic, minced (or 1 tsp garlic powder)
- 1 Tbsp dried parsley (or fresh minced)
- ½ tsp kosher salt
For hidden filling
- ½ cup vanilla frosting (canned or homemade) – tinted any color or left white
For garnish
- Edible glitter dust (gold or white “Parmesan snow”, Use only FDA-approved edible glitter, not “non-toxic” craft glitter)
- Optional: red candy “ornaments” (M&M’s, Sixlets)
Equipment
- 2–3” round cookie cutter (or glass)
- Large baking sheet + parchment
- Pastry brush
- Christmas tree template (optional – freehand works!)
STEP-BY-STEP INSTRUCTIONS
1. PREP THE DOUGH & CAKE (10 min)
- Preheat oven to 375°F / 190°C. Line large baking sheet with parchment.
- Open both dough cans. Unroll onto lightly floured surface.
- Knead spirulina (or green gel) into one can’s dough until evenly green (30 sec).
- Leave second can plain for contrast (optional).
- Use cutter to stamp out 20–24 circles from rainbow cake (eat scraps!).
- Place 1 tsp frosting + pinch mozzarella in center of each cake circle. Fold cake over filling like a mini sandwich; press edges to seal.
2. WRAP THE SURPRISE BITES (10 min)
- Cut each dough canister into 10–12 equal pieces (20–24 total).
- Flatten a dough piece into 3–4” round.
- Place one stuffed cake bite in center. Top with ½ tsp mozzarella.
- Pinch dough around filling to fully seal (like a dumpling). Roll gently into a smooth ball.
- Repeat with all.
3. SHAPE THE CHRISTMAS TREE (10 min)
- Arrange balls on parchment in tree shape:
- Bottom row: 5 balls
- Next: 4 balls
- Next: 3 balls
- Next: 2 balls
- Top: 1 ball (trunk = 1–2 balls at bottom center)
- Press balls gently together so they bake connected.
- Mix melted butter + garlic + parsley + salt. Brush half generously over tree.
4. BAKE GOLDEN (20 min)
- Bake 20 min until deep golden and hollow-sounding when tapped.
- Brush with remaining garlic butter immediately.
- Cool on sheet 5 min (keeps shape).
5. DECORATE & PRANK (5 min)
- Dust heavily with edible glitter “Parmesan snow”.
- Poke in red candy “ornaments” between branches.
- Optional: star-shaped toast on top as tree topper.
SERVING
- Place on wooden board with bread knife.
- Say: “Who wants cheesy garlic pull-apart bread?”
- Watch faces as they tear — rainbow cake explodes in sweet glory!
- Serve with extra frosting “dip” in a gravy boat for double prank.
PRO TIPS
- Store-bought cake hack: Buy a 9×13” rainbow sheet cake from grocery bakery ($8–10).
- Make ahead: Assemble tree up to 4 hrs ahead; cover loosely and refrigerate. Bake fresh.
- No spirulina? Skip green tint – dough still works!
- Vegan? Use vegan pizza dough, mozzarella, butter, and rainbow cake (Pillsbury dough is vegan!).
- Extra savory scent: Add ¼ tsp MSG to garlic butter – smells like pizzeria!
- Storage: Best day-of. Leftovers 1 day at room temp (cake softens dough).
Tear. Scream. Laugh. Repeat.
4. Elf Dust Cotton Candy Cocktail (#elfdust)

Serves 6 | Active time: 5 min | Total time: 10 min | Cost: ~$10
A fluffy green cotton candy cloud perches atop each glass. The moment gin + lemonade cascade over it, the candy melts instantly and triggers a mesmerizing color shift: blue → purple → pink — like magic in a glass!
INGREDIENTS
For the cocktail
- 12 oz (1½ cups) butterfly pea gin (Empress 1908 recommended – naturally blue)
- 6 oz (¾ cup) lemonade (fresh or store-bought, not too sweet)
- 6 pre-portioned green cotton candy tufts (~1 oz each; store-bought or spun)
For the rim & drama
- Edible glitter (silver or gold) + lemon wedge
- Dry ice pellets (food-grade, optional – for fog effect)
Kid-friendly swap
- 18 oz sparkling lemonade + ½ tsp food-grade blue shimmer dust (Brew Glitter)
Equipment
- 6 coupe or rocks glasses
- Small tongs (for dry ice)
- Tray or plate for cotton candy
STEP-BY-STEP INSTRUCTIONS
1. PREP THE GLASSES (3 min)
- Run a lemon wedge around rim of each glass.
- Dip rims in edible glitter on a small plate. Tap off excess.
- Chill glasses in fridge (optional – keeps drink cold longer).
2. STAGE THE COTTON CANDY (1 min)
- Gently perch 1 green cotton candy tuft across the top of each glass.
- It should balance like a cloud (use a fork to shape if needed).
- Place glasses on a serving tray. Keep away from humidity.
3. MIX THE MAGIC POTION (1 min)
- In a measuring cup, combine 12 oz gin + 6 oz lemonade.
- Stir gently — the mix will be vibrant blue.
- Keep chilled until serving.
SERVING (THE REVEAL!)
- Present tray to guests with:
“Watch the cotton candy disappear… and the drink change color!” - Slowly pour ~3 oz potion directly over cotton candy in each glass.
- Instant melt → blue gin hits lemonade’s acid → color shift:
- Blue → Purple → Pink in 3–5 seconds!
- Optional fog: Drop a tiny dry ice pellet (pea-sized) with tongs for swirling mist.
- Warn guests: Do NOT touch or ingest dry ice. Do NOT drink until ice fully sublimates or remove pellet before sipping.
KID-FRIENDLY VERSION
- Replace gin with sparkling lemonade.
- Stir in ½ tsp blue shimmer dust before pouring.
- Same cotton candy vanish, same color magic, zero alcohol.
PRO TIPS
- Cotton candy source: Buy pre-packaged green (lime or apple flavor) from candy shops or Amazon.
- No butterfly pea gin? Infuse regular gin with ½ cup dried butterfly pea flowers (steep 1 hr, strain).
- Make ahead: Rim glasses + stage cotton candy up to 30 min ahead (low humidity only).
- Humidity hack: Work in air-conditioned room; candy melts in steam.
- Extra wow: Serve with color-changing LED ice cubes underneath.
- Safety: Use only food-grade dry ice. Let fog dissipate before sipping.
Poof. Pour. Transform.
5. Reindeer Nose Ravioli (#reindeer)
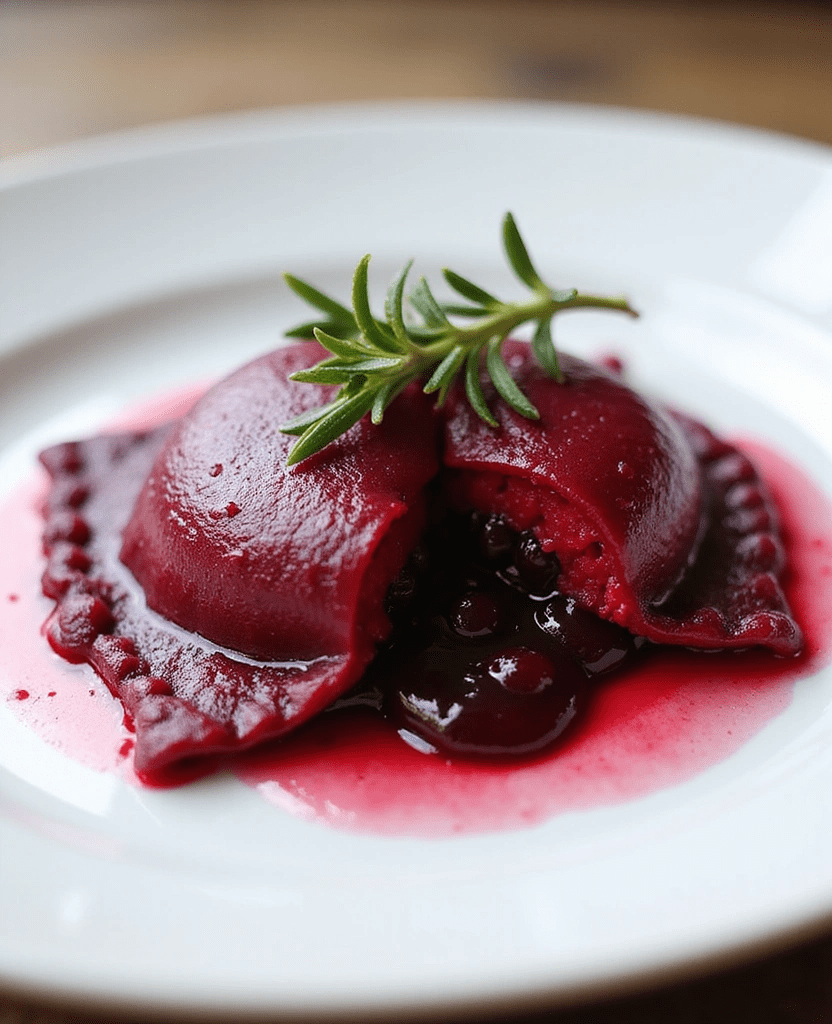
Makes 24 ravioli (serves 6–8) | Active time: 40 min | Total time: 1 hr 15 min (includes resting) | Cost: ~$13
Vibrant beet-red pasta pockets stuffed with creamy ricotta and a hidden cherry compote “nose.” One bite = sweet-tart burst that stains your tongue Rudolph-red. Finished with rosemary “antlers” and a honey-butter glow.
INGREDIENTS
For the beet pasta dough
- 1 cup (125 g) 00 flour or all-purpose flour
- 1 large egg + 1 egg yolk (room temp)
- 2 Tbsp beet purée (from 1 small roasted or boiled beet, blended smooth)
- Pinch of salt
For the filling
- ½ cup (120 g) whole-milk ricotta, drained
- ¼ cup (60 g) cherry compote (store-bought or homemade: pitted cherries + sugar + lemon, cooked thick)
- 1 tsp lemon zest (brightens the “nose”)
For finishing
- 4 Tbsp unsalted butter
- 1 Tbsp honey
- 8–10 small rosemary sprigs (antlers)
- Flaky sea salt + black pepper
Equipment
- Pasta roller or rolling pin
- 2½–3” round or fluted cutter
- Ravioli stamp (optional)
- Pastry brush
STEP-BY-STEP INSTRUCTIONS
1. MAKE BEET DOUGH (10 min + 30 min rest)
- Blend 1 small beet (peeled, cooked) with 1 Tbsp water → smooth purée.
- Mound flour on counter; make a well. Add egg, yolk, 2 Tbsp beet purée, salt.
- Mix with fork, then knead 5–7 min until smooth and elastic (earlobe texture).
- Wrap tightly in plastic; rest 30 min at room temp.
2. MIX THE “NOSE” FILLING (3 min)
- Stir ricotta + cherry compote + lemon zest.
- Transfer to piping bag or zip-top bag (snip corner later). Chill.
3. ROLL & SHAPE RAVIOLI (15 min)
- Divide rested dough in half. Keep one wrapped.
- Roll through pasta machine: start at widest (#1), fold and repeat to #5 or #6 (thin but sturdy).
- No machine? Roll by hand to 1/16” thick on floured surface.
- Lay sheet on floured counter. Pipe 1 tsp filling every 2” (12 mounds per sheet).
- Brush water around mounds. Top with second sheet; press out air.
- Cut with cutter or knife into 24 rounds/squares. Crimp edges with fork.
- Place on floured tray; cover with damp towel.
4. COOK & FINISH (10 min)
- Bring large pot of salted water to gentle boil.
- Boil ravioli 2 min (they float when done).
- Meanwhile, melt butter in skillet over medium. Cook until nutty-brown (30 sec).
- Remove ravioli with slotted spoon → toss in brown butter.
- Stir in 1 Tbsp honey off heat for glossy sheen.
PLATING (THE REVEAL!)
- Stack 3–4 ravioli per plate like a reindeer face.
- Insert 2 rosemary sprigs as antlers.
- Brush lightly with honey-butter from pan for Rudolph-red shine.
- Sprinkle flaky salt + crack of pepper.
- Serve with: “Bite the nose — see what happens!”
→ POP! Cherry compote bursts, tongue turns red.
PRO TIPS
- Beet purée hack: Use baby food beet pouch (no additives).
- Make ahead: Freeze shaped ravioli on tray, then bag. Boil from frozen +1 min.
- No compote? Use ¼ cup pitted cherries + 1 Tbsp sugar + splash lemon; mash.
- Vegan swap: Cashew ricotta + agar dough (search “vegan beet pasta”).
- Extra glow: Dust with edible red luster dust before the honey brush.
- Storage: Cooked ravioli best fresh. Reheat gently in butter.
Bite. Burst. Blush.
6. Polar Express Hot Chocolate Train (#train)
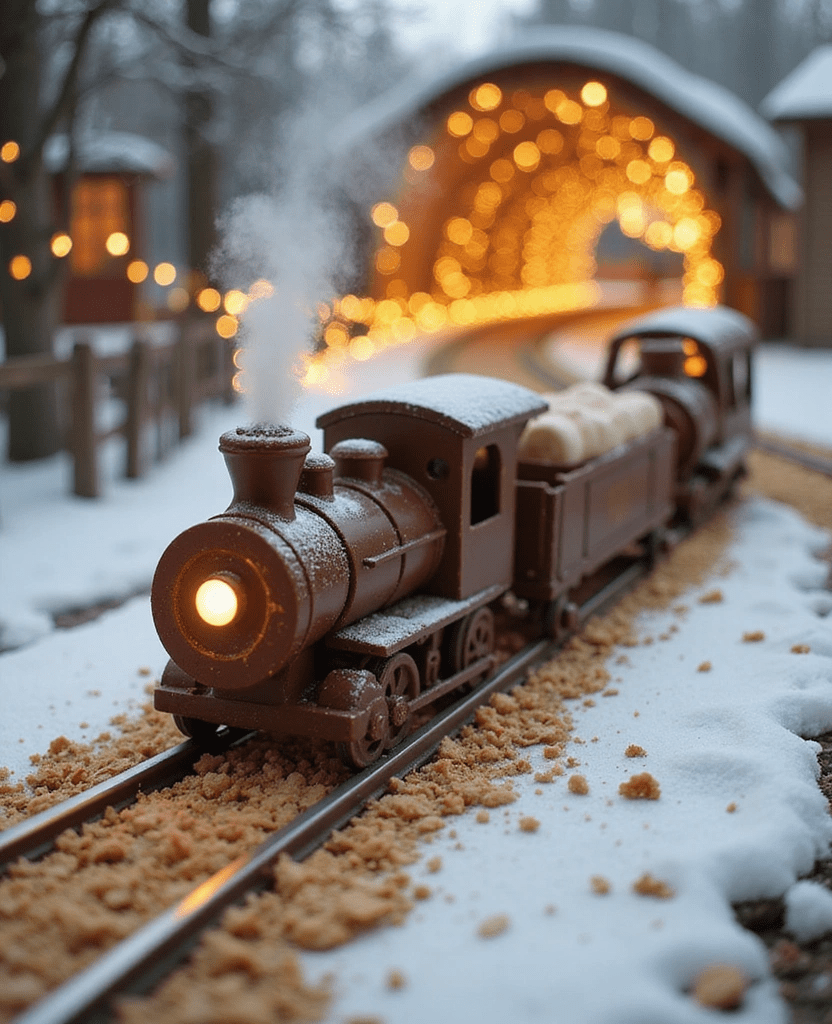
Serves 8 | Active time: 25 min | Total time: 1 hr (includes chilling) | Cost: ~$15
A gleaming edible chocolate train glides on Oreo “snow tracks.” At the table, pour in piping-hot cocoa and watch marshmallow foam billow like real steam — a locomotive leaving the station in your mouth!
INGREDIENTS
For the chocolate train
- 12 oz (1½ cups) dark or milk chocolate chips (good quality – Ghirardelli or Lindt)
- Silicone train mold (8 mini cars, ~2 oz each; locomotive + cars)
For the hot cocoa
- 4 cups (1 L) prepared hot cocoa (homemade or Swiss Miss packets)
- 1 drop peppermint extract (optional, per serving)
For the “steam” foam
- 1 cup marshmallow fluff (Jet-Puffed)
- ½ cup heavy cream, cold
- ½ tsp vanilla extract
For the tracks & scenery
- 16 Oreo cookies, finely crushed (snowy gravel)
- Edible gold dust or white sprinkles (optional sparkle)
Equipment
- Train mold (Amazon: “chocolate train silicone mold”)
- Piping bag + small round tip (#12)
- Small squeeze bottle or funnel
- Candy thermometer
STEP-BY-STEP INSTRUCTIONS
1. MOLD THE CHOCOLATE TRAIN (15 min + 30 min chill)
- Melt 12 oz chocolate in microwave: 30-sec bursts, stir until 115°F / 46°C.
- Pour into clean, dry train mold. Tap firmly to remove bubbles.
- Chill 10 min in fridge until set but flexible.
- Unmold gently onto parchment. Trim rough edges with warm knife.
- Hollow the cars: Use a warm teaspoon to scoop a shallow well in each car (leave ¼” walls).
- Keep locomotive solid for looks.
2. PREP THE “SNOW TRACKS” (3 min)
- Line a long platter with crushed Oreos in two parallel lines (train tracks).
- Dust lightly with gold dust or white sprinkles for sparkle.
3. MAKE MARSHMALLOW STEAM FOAM (5 min)
- Whip ½ cup cold cream to soft peaks.
- Fold in 1 cup fluff + ½ tsp vanilla until smooth and pipeable.
- Load into piping bag with #12 tip. Chill until serving.
4. HEAT THE COCOA (2 min)
- Heat 4 cups cocoa to 160°F / 71°C (steaming hot, not boiling).
- Stir in 1 drop peppermint extract per car (optional). Keep hot in thermos.
TABLE-SIDE ASSEMBLY (THE REVEAL!)
- Place 8 chocolate cars on Oreo tracks (locomotive at front).
- At the table:
“All aboard the Hot Cocoa Express!” - Using squeeze bottle or tiny funnel, fill each car with ~½ cup hot cocoa (to rim).
- Immediately pipe marshmallow foam in swirling “steam” clouds from the locomotive chimney and car tops.
- Foam rises and billows for 30–60 sec — real steam effect!
- Serve with mini spoons or let guests sip from the car.
PRO TIPS
- Mold hack: No train mold? Use mini loaf pans + pipe chocolate wheels.
- Make ahead: Mold trains up to 2 days ahead; store airtight at room temp.
- Kid-friendly: Fill with warm (not hot) cocoa + extra fluff.
- Extra magic: Drop a mini dry ice chip in locomotive (with tongs) for real fog.
- Vegan swap: Dairy-free chocolate, oat milk cocoa, aquafaba fluff.
- Storage: Best served immediately. Chocolate softens in heat.
Chugga-chugga… CHOO-CHOO!
7. Gingerbread House Deviled Eggs (#gingerbread)
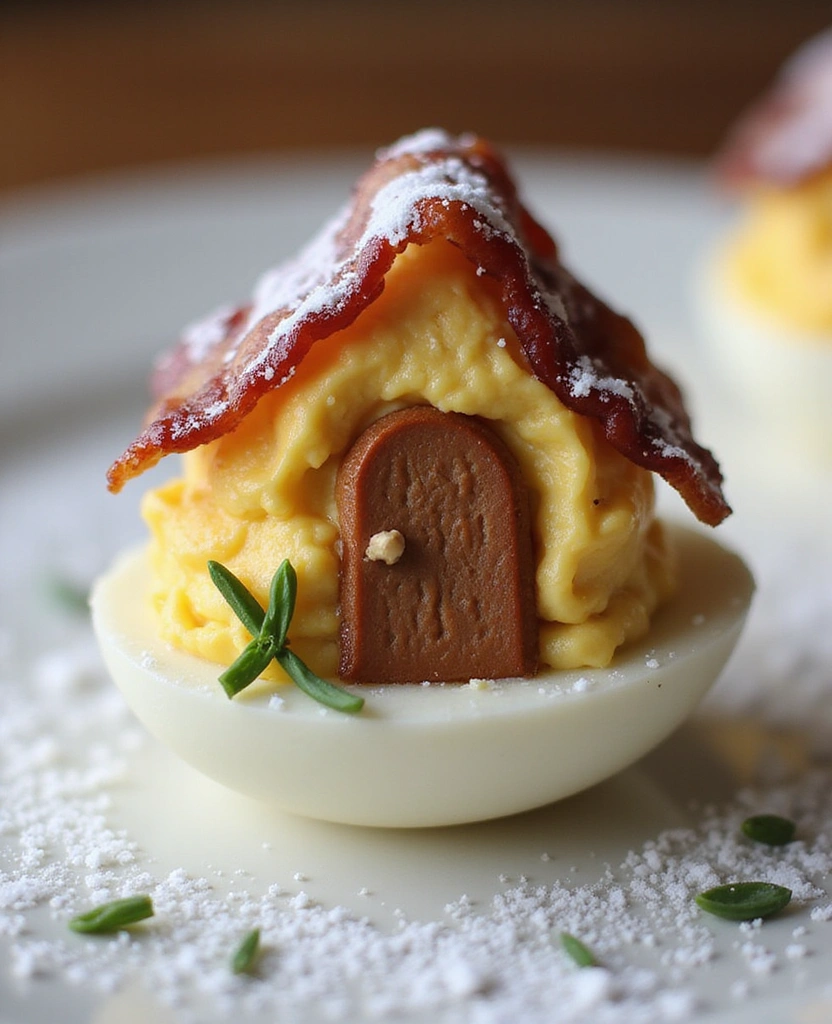
Makes 12 houses (serves 6) | Active time: 20 min | Total time: 35 min (includes cooling) | Cost: ~$8
Adorable deviled eggs disguised as tiny gingerbread cottages — complete with crisp bacon “shingles,” a chive door, and a snowy sugar roof. One bite = creamy, smoky, holiday magic!
INGREDIENTS
For the egg “houses”
- 6 large eggs (room temp)
- 2 Tbsp mayonnaise (Duke’s or Hellmann’s)
- 1 tsp Dijon mustard
- ½ tsp white vinegar
- Pinch smoked paprika + pinch salt
For the bacon roof
- 12 slices thin-cut bacon (center-cut works best)
For decoration
- 6–8 chives, cut into 1” pieces (doors)
- Powdered sugar (for snow)
- ½ cup gingerbread cookie crumbs (store-bured or crushed cookies)
Equipment
- Piping bag + star tip (#1M or #6B)
- Small sharp knife
- Cooling rack + paper towels
STEP-BY-STEP INSTRUCTIONS
1. HARD-BOIL & HALVE EGGS (12 min + 10 min cool)
- Place eggs in saucepan, cover with cold water + 1” extra.
- Bring to rolling boil → cover, turn off heat, steep 10 min.
- Shock in ice bath 5 min. Peel under running water.
- Slice eggs lengthwise. Pop yolks into bowl. Wipe whites dry.
2. MAKE CREAMY FILLING (3 min)
- Mash yolks with fork.
- Stir in mayo, mustard, vinegar, paprika, salt until silky.
- Load into piping bag with star tip.
3. COOK BACON “SHINGLES” (10 min)
- Line microwave plate with 2 paper towels.
- Lay 6 bacon strips flat. Cover with 2 more towels.
- Microwave 3–4 min until crisp but pliable (not brittle).
- Repeat with remaining 6. Cool on rack 2 min → cut each strip in half crosswise (24 shingles).
4. ASSEMBLE THE HOUSES (10 min)
- Arrange 12 egg-white halves cut-side up on gingerbread-crumb “yard” (scatter crumbs on platter).
- Pipe filling in a tall peaked swirl (like a roof ridge) down the center of each white.
- Lay 2 bacon halves overlapping like shingles over the peak (one on each slope).
- Insert 1 chive piece upright at the front as a door.
- Lightly dust entire plate with powdered sugar snow (use fine sieve).
SERVING (THE REVEAL!)
- Present on a wooden board or slate.
- Say: “Who wants a bite of the gingerbread village?”
- Watch guests do a double-take: “Wait, is that egg wearing a chimney?!”
- One bite = smoky bacon crunch → creamy paprika kick.
PRO TIPS
- Perfect peaks: Chill filling 10 min before piping for sharper roofs.
- Make ahead: Boil eggs + cook bacon 1 day ahead. Assemble same day.
- Vegetarian swap: Use coconut “bacon” or smoked paprika-dusted phyllo strips.
- Extra charm: Pipe tiny yellow mustard “windows” or red pepper flake “lights.”
- Spicy kick: Add dash hot sauce to yolk mix.
- Storage: Best within 2 hrs. Refrigerate leftovers up to 1 day (bacon softens).
Egg-cellent holiday prank!
8. Santa’s Boot Print Bruschetta (#santa)
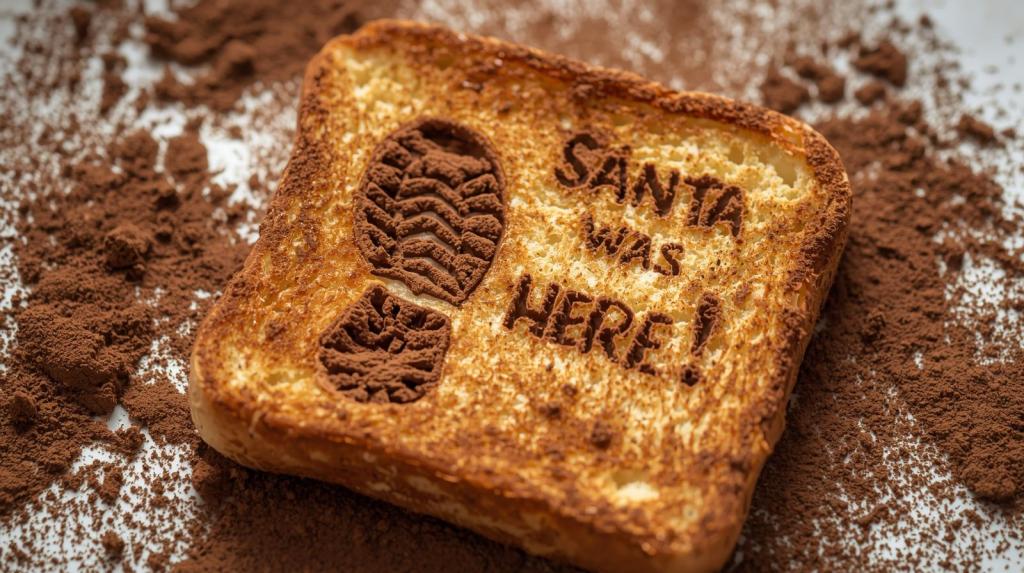
Serves 12 | Active time: 15 min | Total time: 20 min | Cost: ~$10
Crispy baguette rounds stamped with a ricotta “boot print” and smeared in jam “mud” — proof Santa stopped by for a snack! A dusting of Parmesan “snow” seals the magic.
INGREDIENTS
For the toast base
- 1 baguette, cut into 12 diagonal slices (½” thick)
- 2 Tbsp olive oil or melted butter
For the ricotta “boot print”
- 1 cup (250 g) whole-milk ricotta, drained
- 1 tsp lemon zest (brightens the “snow”)
- Pinch of salt
For the jam “mud”
- ½ cup strawberry jam (seedless preferred)
- 1 tsp cocoa powder (for earthy mud tone)
For the snowy finish
- ¼ cup finely grated Parmesan (real Parmigiano-Reggiano)
- Mini boot stencil (3” – printable or cookie-cutter)
Equipment
- Piping bag + small round tip (#6 or #8)
- Small offset spatula
- Fine-mesh sieve (for snow)
STEP-BY-STEP INSTRUCTIONS
1. TOAST THE BAGUETTE (5 min)
- Preheat oven to 400°F / 205°C.
- Brush both sides of slices with oil/butter.
- Bake on sheet 5–7 min until golden. Cool 2 min (crisp base).
2. MIX RICOTTA “SNOW” (2 min)
- Stir ricotta + lemon zest + salt until fluffy.
- Load into piping bag with #6 tip.
3. MAKE JAM “MUD” (1 min)
- Warm jam 10 sec in microwave.
- Whisk in cocoa powder until muddy-brown.
4. ASSEMBLE THE BOOT PRINTS (7 min)
- Place boot stencil over a toast round.
- Pipe ricotta in a thick boot shape (heel + tread). Lift stencil cleanly.
- Repeat for all 12.
- Use offset spatula to smear 1 tsp jam “mud” around the print (like Santa stepped in it).
- Lightly drizzle extra jam for fresh tracks.
5. SNOWFALL FINISH (1 min)
- Load Parmesan into sieve.
- Tap gently over entire platter for even snow dusting.
SERVING (THE REVEAL!)
- Arrange on a dark wooden board.
- Serve with mugs of hot cocoa and say:
“Santa was here… look at the boot print in the mud!” - Kids go wild; adults smile. One bite = creamy zest + jammy cocoa crunch.
PRO TIPS
- Stencil hack: No boot? Print a 3” outline, cut out, hold with tongs.
- Make ahead: Toast + mix fillings 4 hrs ahead. Assemble just before serving.
- Vegan swap: Cashew ricotta + vegan Parmesan + raspberry jam.
- Extra proof: Add a tiny red candy “button” near the print.
- Midnight vibe: Dim lights, play soft sleigh-bell music.
- Storage: Best within 1 hr. Ricotta softens toast after 2 hrs.
Hoofprints? Nah — BOOTPRINTS!
9. Frozen Firecracker Shrimp (#firecracker)
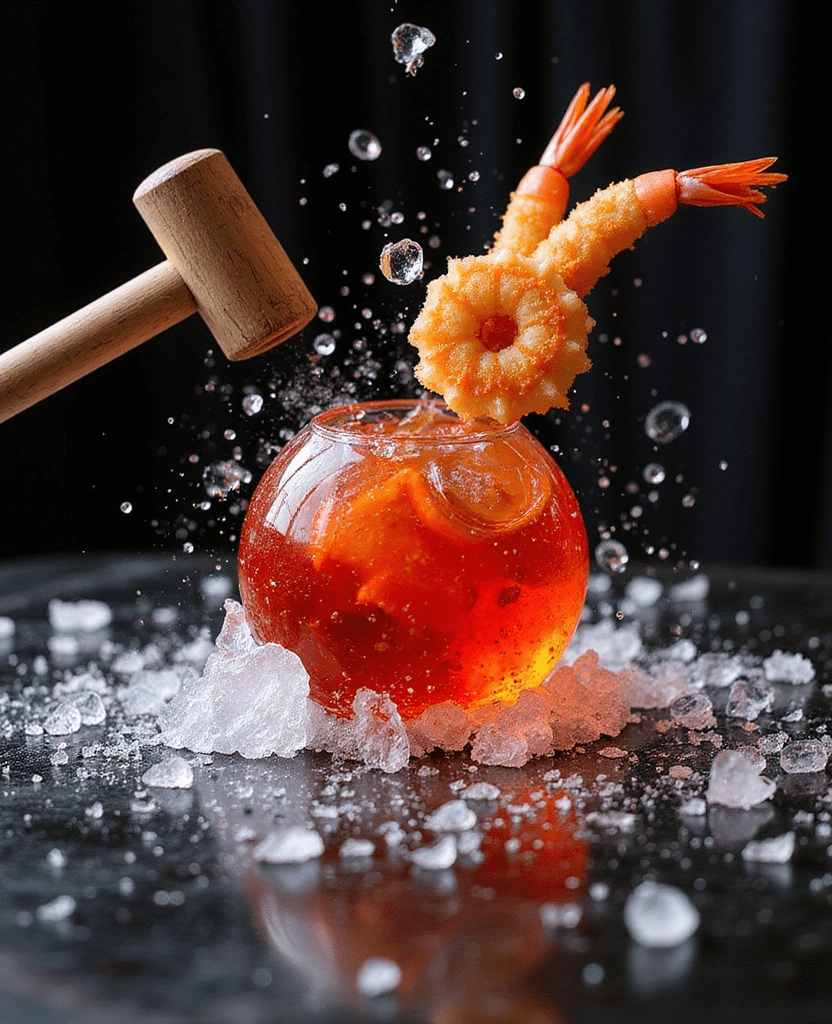
Serves 8 | Active time: 20 min | Total time: 4 hr (includes freezing) | Cost: ~$14
A vibrant red ice orb encases a golden tempura shrimp like a frozen jewel. Guests SMASH it with a tiny mallet — CRACK! — and steaming-hot shrimp bursts free in a cloud of frost. Pure holiday theater!
INGREDIENTS
For the tempura shrimp
- 8 large shrimp (peeled, deveined, tail-on)
- ½ cup tempura batter mix (Kikkoman or store brand)
- ⅓ cup ice-cold sparkling water
- ¼ cup panko + tempura bits (for extra crunch)
- Oil for frying (neutral, high-smoke)
For the red ice sphere
- 2 cups filtered water
- 8–10 drops red food gel (not liquid – for deep color)
- 8 silicone sphere molds (2.5” diameter, 2-part)
For serving
- Ginger soy dipping sauce (¼ cup soy + 1 tsp grated ginger + 1 tsp honey)
- 8 mini wooden mallets (or clean toy hammers)
- Crushed ice bed
Equipment
- Deep-fry thermometer
- 2-part silicone sphere mold (Amazon: “ice ball mold”)
- Small funnel
STEP-BY-STEP INSTRUCTIONS
1. FRY TEMPURA SHRIMP (10 min)
- Heat 2” oil to 350°F / 175°C in small pot.
- Whisk tempura mix + sparkling water (lumpy = crispy).
- Dip shrimp → coat in panko/tempura bits.
- Fry 60–90 sec until golden. Drain on rack.
- Keep warm in 200°F oven while making ice.
2. TINT & FREEZE ICE SPHERES (10 min + 4 hr freeze)
- Mix 2 cups water + red gel until blood-red.
- Place 1 warm shrimp upright in bottom half of each mold.
- Snap on top half. Insert funnel in hole.
- Pour red water to fill; tap to remove bubbles.
- Freeze 4 hr (or overnight).
3. PREP DIPPING SAUCE (1 min)
- Stir soy + ginger + honey. Divide into 8 tiny cups.
TABLE-SIDE SMASH (THE REVEAL!)
- Nestle frozen spheres in crushed ice on individual plates.
- Hand each guest a mini mallet and say:
“Smash it like a piñata — dinner’s inside!” - CRACK! Ice shatters → steaming shrimp pops out (heat trapped inside).
- Dip in ginger sauce — crisp, hot, juicy.
PRO TIPS
- Perfect sphere: Use filtered water → crystal-clear ice.
- Make ahead: Fry shrimp + freeze spheres up to 2 days. Reheat shrimp 5 min at 350°F before serving.
- Kid-safe: Skip mallet → let them tap with spoon.
- Vegan swap: Tempura enoki mushrooms + veggie broth ice.
- Extra drama: Add dry ice fog under platter (food-grade, with tongs).
- Storage: Best served immediately after smash.
SMASH. CRACK. WOW!
10. Midnight Countdown Dessert Sphere (#countdown)

Serves 8 | Active time: 25 min | Total time: 1 hr (includes chilling) | Cost: ~$15
A glossy chocolate sphere hides an edible wafer clock + crackling Pop Rocks. At the table, pour scalding-hot raspberry coulis — the sphere melts in seconds, the clock “counts down,” and midnight strikes with a sparkling pop!
INGREDIENTS
For the chocolate spheres
- 12 oz (1½ cups) dark chocolate (60–70% cacao, Callebaut or Ghirardelli)
- Silicone half-sphere mold (8 cavities, 2.5” diameter)
For the hidden clock
- 8 edible wafer paper clocks (3” printed with food-safe ink – Etsy or print at home)
- 2 Tbsp raspberry Pop Rocks (or strawberry)
For the midnight coulis
- 2 cups (10 oz) frozen raspberries
- ¼ cup sugar
- 1 Tbsp lemon juice
- Edible gold leaf (8 tiny flecks)
Equipment
- 2-part sphere mold
- Piping bag + small round tip (#4)
- Candy thermometer
- Small squeeze bottle (for hot coulis)
STEP-BY-STEP INSTRUCTIONS
1. MOLD CHOCOLATE SPHERES (15 min + 20 min chill)
- Temper chocolate: microwave 30-sec bursts → 115°F / 46°C, stir to 82°F / 28°C, reheat to 90°F / 32°C.
- Pour into bottom half of 8 mold cavities. Swirl to coat sides; invert to drain excess.
- Chill 5 min. Repeat for second coat (thick shell).
- Fill top half molds with tempered chocolate; chill 5 min.
- Unmold gently. Warm a knife → trim edges for perfect seal.
2. ASSEMBLE THE CLOCK BOMBS (7 min)
- Place 1 wafer clock face-up in each bottom sphere.
- Sprinkle ½ tsp Pop Rocks on clock.
- Pipe a thin ring of melted chocolate around rim.
- Press top sphere on → seal perfectly. Wipe excess.
- Chill 10 min to set.
3. MAKE HOT RASPBERRY COULIS (5 min)
- Simmer raspberries + sugar + lemon juice → mash, strain seeds.
- Keep piping hot (160°F / 71°C) in squeeze bottle.
TABLE-SIDE COUNTDOWN (THE REVEAL!)
- Place 1 sphere on each guest’s small white plate.
- Dim lights. Say:
“3… 2… 1… MIDNIGHT!” - Pour hot coulis in a slow circle over sphere.
- MELT! Chocolate collapses → clock appears → Pop Rocks crackle → gold leaf sparkles.
- Serve with mini spoons — eat the clock, sip the sauce.
PRO TIPS
- Wafer clock DIY: Print clock faces on edible wafer paper (Amazon) with food-color printer.
- Make ahead: Spheres last 3 days in cool, dry place. Coulis: reheat before serving.
- Kid version: Use warm (not hot) coulis + no Pop Rocks.
- Vegan swap: Dairy-free chocolate + coconut oil temper.
- Extra crackle: Add 1 drop peppermint oil to Pop Rocks.
- Storage: Best within 1 hr of melt. Chocolate re-sets if not eaten.
- 3… 2… 1… MELT!
Free Surprise Recipe
👉 Get the “Unexpected Feast” Printable Menu
Save, share, and make this season unforgettable.
Note: We aim to provide accurate product links, but some may occasionally expire or become unavailable. If this happens, please search directly on Amazon for the product or a suitable alternative.
This post contains Amazon affiliate links, meaning I may earn a small commission if you purchase through my links, at no extra cost to you.

Leave a comment