Planning a toddler’s birthday party can be both exciting and a bit overwhelming, especially when it comes to snacks.
These DIY toddler birthday snacks are not only fun to make, but they are also delicious and kid-approved!
From colorful fruit kabobs to whimsical cupcakes, these snack ideas will bring a smile to every little face. Get ready to roll up your sleeves and create some delightful treats that will be the highlight of the celebration!
Contents
- 1. Rainbow Fruit Kabobs
- 2. Edible Glitter Cupcakes
- 3. Mini Pizzas with Fun Toppings
- 4. Yogurt Parfaits
- 5. Fun-Shaped Sandwiches
- 6. Chocolate-Dipped Pretzel Rods
- 7. Fruit and Cheese Skewers
- 8. Veggie Cups with Hummus
- 9. Frozen Banana Pops
- 10. DIY Trail Mix Bar
- 11. Ice Cream Cone Fruit Cups
- 12. Peanut Butter and Banana Roll-Ups
- 13. Savory Cheese and Veggie Muffins
- 14. Colorful Gelatin Cups
1. Rainbow Fruit Kabobs
These Rainbow Fruit Kabobs are a colorful and healthy treat that kids will love. Not only are they visually appealing, but they also offer a fun way for little ones to enjoy their fruit. With simple assembly and vibrant colors, these kabobs can be a delightful addition to any toddler birthday celebration. Plus, they provide an excellent opportunity for kids to get involved in the kitchen!
Ingredients:
– 1 cup strawberries, hulled and halved
– 1 cup oranges, peeled and segmented
– 1 cup pineapple, cut into chunks
– 1 cup green grapes
– 1 cup blueberries
– 1 cup purple grapes
– Optional: Decorative toothpicks or reusable fruit skewers
Instructions:
1. Prep the Fruit: Wash and prepare all the fruits. Halve the strawberries, peel and segment the oranges, and cut the pineapple into bite-sized chunks.
2. Gather the Skewers: Take your reusable fruit skewers or decorative toothpicks and lay them out for easy access.
3. Assemble the Kabobs: Start by threading the fruits onto the skewers in a rainbow order – strawberries first, followed by oranges, pineapple, green grapes, blueberries, and purple grapes.
4. Create Fun Shapes (Optional): If using fruit cutters, you can cut some of the fruits into fun shapes before skewering for an extra playful touch.
5. Serve: Arrange the finished kabobs on vibrant serving platters to make them visually appealing.
6. Get Kids Involved: Have the kids wear their aprons and help with the assembly for a fun and interactive kitchen experience!
These Rainbow Fruit Kabobs are not only a great way to encourage healthy eating among toddlers but also a fantastic DIY toddler birthday snack that’s easy to prepare and sure to impress!
Product Recommendations:
• Fruit skewers set
• fun-shaped fruit cutters
• colorful serving platters
2. Edible Glitter Cupcakes
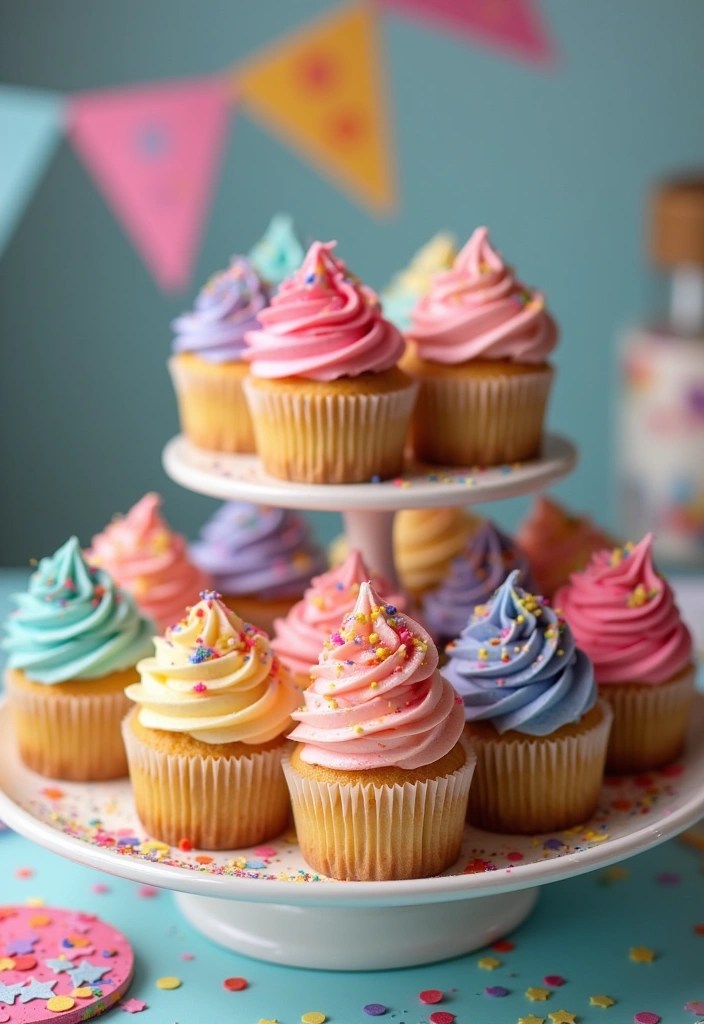
Cupcakes are a beloved staple at any birthday celebration, and these Edible Glitter Cupcakes elevate them to new heights of excitement! Start with a simple vanilla or chocolate cake base, then unleash your creativity by decorating with vibrant frosting from colorful frosting bags and a sprinkle of edible glitter that will captivate the little ones.
To add an extra touch of fun, consider using delightful fun cupcake toppers that complement the birthday theme, transforming your treats into the stars of the dessert table. For a hassle-free baking experience, bake your cupcakes in silicone cupcake molds that ensure perfectly shaped and easy-to-remove cupcakes every time. Get ready for a dazzling birthday celebration that kids will remember!
Ingredients:
– For the Cupcakes:
– 1 ½ cups all-purpose flour
– 1 cup granulated sugar
– ½ cup unsalted butter, softened
– 2 large eggs
– 1/2 cup milk
– 2 tsp baking powder
– 1 tsp vanilla extract
– 1/4 tsp salt
– For the Frosting:
– 1 cup unsalted butter, softened
– 4 cups powdered sugar
– 2-4 tbsp milk
– 1 tsp vanilla extract
– Food coloring (optional)
– For Decoration:
– Edible glitter
– Fun cupcake toppers
Instructions:
1. Preheat your oven to 350°F (175°C) and line your silicone cupcake molds with cupcake liners.
2. In a large mixing bowl, cream the softened butter and granulated sugar together until light and fluffy.
3. Add the eggs one at a time, mixing well after each addition. Stir in the vanilla extract.
4. In a separate bowl, whisk together the flour, baking powder, and salt.
5. Gradually add the dry ingredients to the wet mixture, alternating with the milk. Mix until just combined.
6. Fill each cupcake mold about two-thirds full with batter and bake for 18-20 minutes, or until a toothpick inserted comes out clean.
7. While the cupcakes cool, prepare the frosting by beating the softened butter until creamy. Gradually add the powdered sugar, followed by the milk and vanilla extract, until you reach your desired consistency.
8. If desired, add food coloring to the frosting and mix until evenly colored.
9. Once the cupcakes are completely cool, frost them generously with your colorful frosting.
10. Sprinkle edible glitter over the frosted cupcakes and add fun cupcake toppers to match your birthday theme.
11. Serve and watch the kids light up with joy! Enjoy your delicious DIY toddler birthday snacks!
Product Recommendations:
• Silicone cupcake molds
• Edible glitter
• Food coloring set
3. Mini Pizzas with Fun Toppings
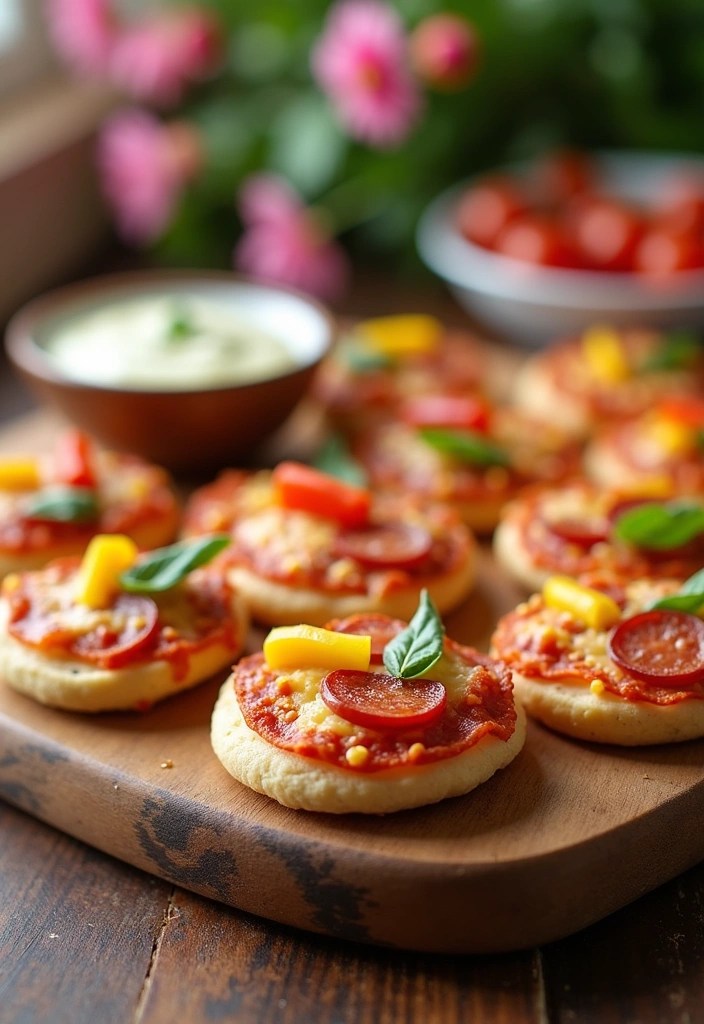
Mini pizzas are not only a delicious treat but also a fun way to get toddlers involved in the kitchen! Using mini pita bread or English muffins as the base, little ones can add their favorite toppings, making it a creative hands-on activity. With the right tools, like mini pizza trays to keep everything organized, this cooking venture is sure to be a hit at any birthday celebration.
Once they’ve created their masterpieces, bake the mini pizzas until the cheese is bubbly and golden. A baking sheet ensures even cooking, making for perfectly crispy mini pizzas. Serve these warm and watch as everyone comes back for seconds, especially with a handy pizza cutter to slice them up!
Don’t forget to provide kid-friendly utensils for your little chefs, making it easy for them to enjoy their creations. You can even use fun-shaped cookie cutters to create unique toppings that will delight their imaginations. This engaging activity will not only satisfy hungry tummies but also foster creativity in the kitchen!
Ingredients:
– Mini pita bread or English muffins (about 6-8)
– Tomato sauce (1 cup)
– Shredded mozzarella cheese (2 cups)
– Pepperoni slices (1 cup, or to taste)
– Bell peppers, diced (1/2 cup, any color)
– Olives, sliced (1/2 cup, optional)
– Any additional toppings your child loves (pineapple, mushrooms, etc.)
– Olive oil (for brushing the pita or muffins, optional)
Instructions:
1. Preheat your oven to 400°F (200°C).
2. Place mini pita breads or English muffins on a baking sheet or mini pizza trays.
3. Let the toddlers spread a spoonful of tomato sauce on each base, using the back of the spoon.
4. Sprinkle a generous amount of shredded mozzarella cheese over the sauce.
5. Allow your little chefs to add their favorite toppings—pepperoni, bell peppers, olives, and any other fun ingredients.
6. If desired, brush the edges with a little olive oil for extra flavor and crispiness.
7. Bake in the preheated oven for about 10-12 minutes, or until the cheese is bubbly and golden.
8. Remove from the oven and let cool slightly before slicing with a pizza cutter.
9. Serve warm with kid-friendly utensils and enjoy the delicious creations together!
Product Recommendations:
• Mini pizza trays
• kid-friendly pizza cutter
• fun-shaped cookie cutters
4. Yogurt Parfaits
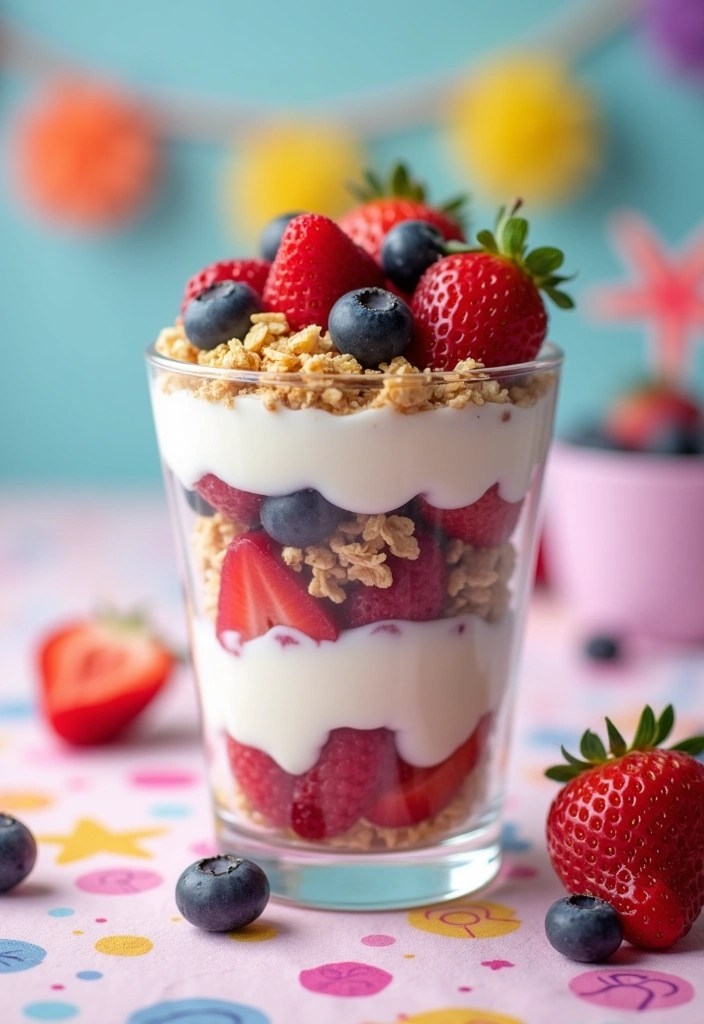
Yogurt parfaits are not only a nutritious snack but also a visually stunning option that toddlers can help create!
By layering creamy yogurt cups with crunchy granola and vibrant assorted berries, you can whip up a delicious treat that’s as good for you as it is visually appealing.
Use clear plastic cups to showcase those colorful layers and let the little ones choose their favorite fruits to include in their parfaits. This snack is not just healthy; it’s also interactive, allowing toddlers to engage in the fun of assembling their own creations. Perfect for a birthday celebration, these parfaits will surely delight both kids and their parents alike, making it a memorable addition to the festivities! Don’t forget to have some colorful serving spoons on hand for serving!
Ingredients:
– 4 cups of yogurt (any flavor you prefer)
– 2 cups of granola
– 2 cups of assorted berries (strawberries, blueberries, raspberries, etc.)
– Honey or maple syrup (optional, for sweetness)
– Clear plastic cups (for serving)
Instructions:
1. Start by gathering all your ingredients and clear plastic cups.
2. If using whole fruits, wash and chop the berries into bite-sized pieces.
3. Begin layering the parfaits in the clear plastic cups. Start with a layer of yogurt at the bottom.
4. Add a layer of granola on top of the yogurt.
5. Next, add a layer of assorted berries over the granola.
6. Repeat the layers until the cups are filled, finishing with a layer of berries on top.
7. If desired, drizzle a little honey or maple syrup on the top layer for added sweetness.
8. Serve immediately with colorful serving spoons, or refrigerate for a short time before serving.
These yogurt parfaits are not only a treat to eat but also a fun way for toddlers to get involved in their own snack preparation. Enjoy the smiles they bring!
Product Recommendations:
• Clear plastic cups
• colorful serving spoons
• assorted berries pack.
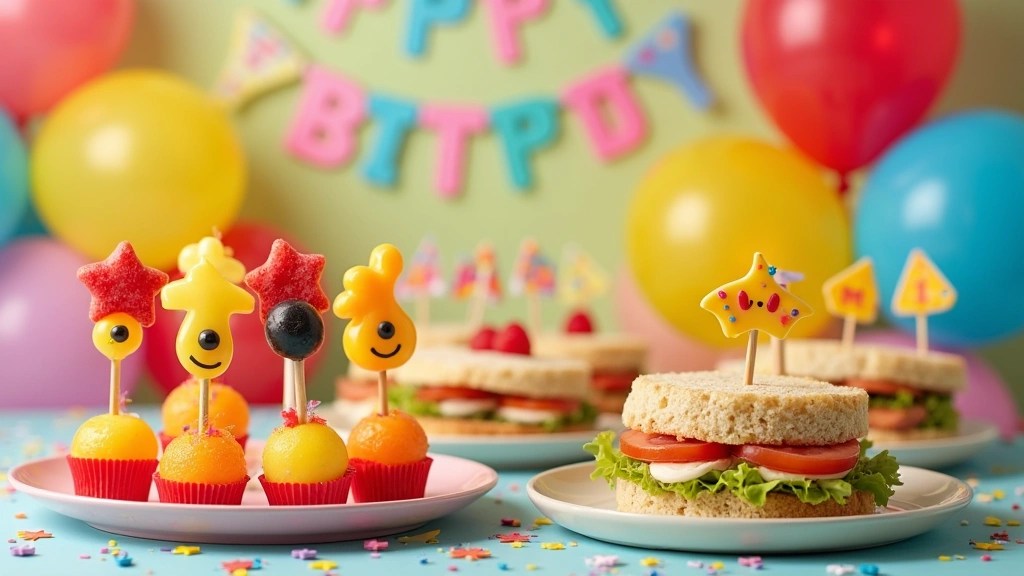
5. Fun-Shaped Sandwiches
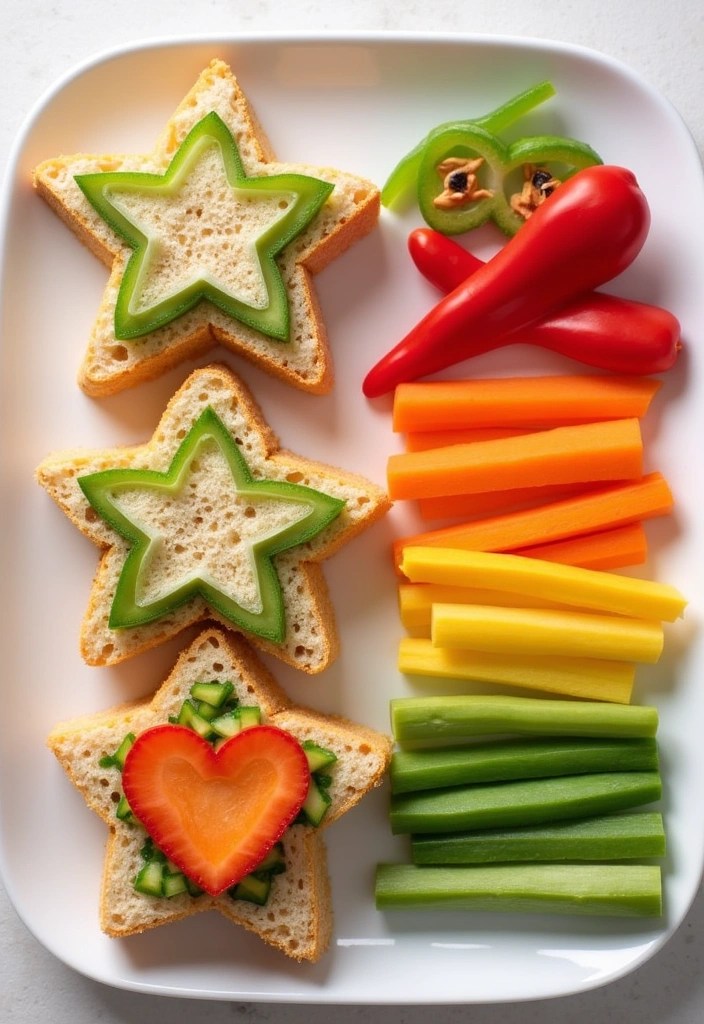
Transform ordinary sandwiches into extraordinary culinary creations using fun-shaped cookie cutters! With a selection of fun-shaped cookie cutters, you can easily craft delightful shapes like stars, hearts, or adorable animals from whole-grain bread. Spread some delicious nut butter or smooth cream cheese, and layer on fresh veggies or deli meats for a nutritious twist.
These whimsical sandwiches not only taste great but also pack the energy kids need for the party festivities. To create a colorful and crunchy side, pair them with colorful veggie sticks. Plus, keep everything organized and fresh by using kid-friendly lunch containers for easy serving and storage!
Ingredients:
– Whole-grain bread (2 slices per sandwich)
– Nut butter (peanut, almond, or sunflower)
– Cream cheese (plain or flavored)
– Fresh veggies (cucumbers, bell peppers, carrots, etc.)
– Deli meats (turkey, ham, or chicken)
– Fun-shaped cookie cutters
– Colorful veggie sticks (carrots, celery, bell peppers, etc.)
– Kid-friendly lunch containers
Instructions:
1. Prepare Your Workstation: Gather all your ingredients and cookie cutters on a clean surface.
2. Cut the Bread: Use the fun-shaped cookie cutters to cut the whole-grain bread into desired shapes. You can create multiple shapes from one slice to make it more fun.
3. Spread the Base: Take one shape of bread and spread a layer of nut butter or cream cheese on one side.
4. Add Fillings: Layer on your choice of fresh veggies and deli meats on top of the spread. Be creative with the arrangement for added appeal!
5. Top It Off: Place another fun-shaped piece of bread on top to create a sandwich.
6. Serve with Veggie Sticks: Cut colorful veggie sticks to serve alongside the sandwiches for a crunchy side that complements the meal.
7. Pack for Freshness: Use kid-friendly lunch containers to keep the sandwiches and veggie sticks fresh until serving.
These fun-shaped sandwiches are not only visually appealing but also a hit with the little ones, making them an ideal addition to your DIY toddler birthday snacks!
Product Recommendations:
• Fun-shaped cookie cutters set
• Kid-friendly lunch containers
• Whole-grain sandwich bread
6. Chocolate-Dipped Pretzel Rods
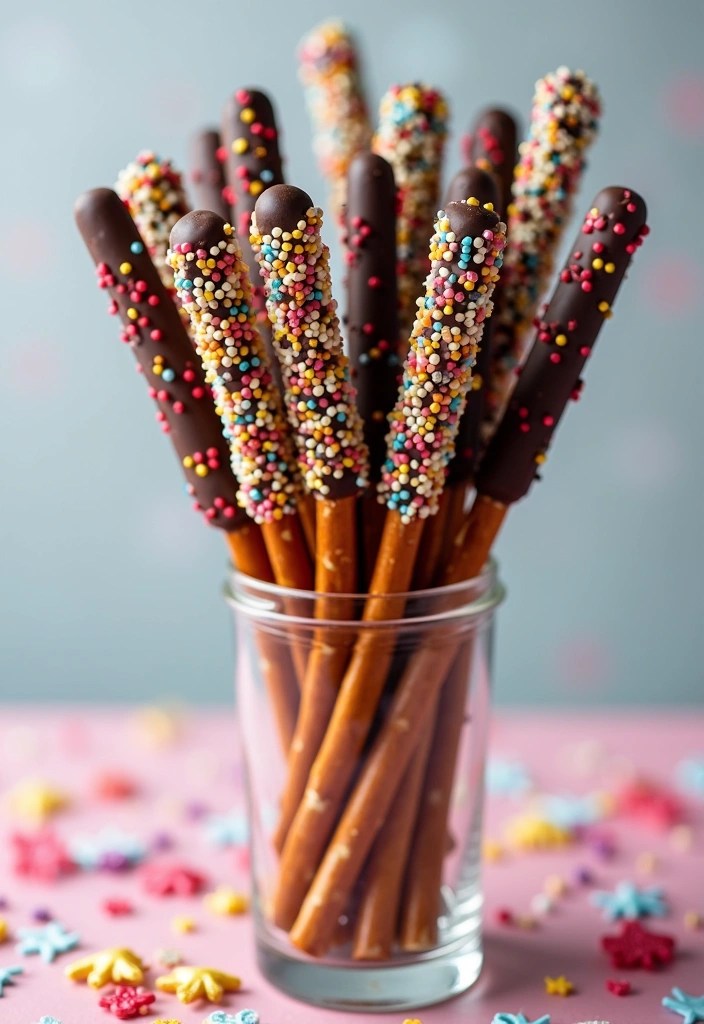
These Chocolate-Dipped Pretzel Rods offer a delightful balance of sweet and salty flavors that are sure to please everyone at the birthday celebration! They’re not only delicious but also a fun activity for the kids to get involved in. With just a few simple ingredients, you can create a festive treat that looks as good as it tastes.
These delicious snacks are simple to prepare and can be made in advance, making them an ideal choice for busy parents. To keep your workspace tidy, consider using parchment paper for easy cleanup.
Kids will love the satisfying crunch of the pretzel combined with the sweetness of the chocolate, and they can even join in on the decorating fun for a memorable activity. Once finished, serve these delightful treats in glass jars for a charming presentation that will impress your guests!
Ingredients:
– Pretzel rods (1 package)
– Melting chocolate (1-2 cups, depending on how many you want to make)
– Colorful sprinkles or crushed nuts (for decoration)
– Parchment paper (for easy cleanup)
– Glass jars (for serving)
Instructions:
1. Begin by melting the chocolate according to the package instructions. You can use a microwave or a double boiler for this step.
2. Once the chocolate is melted and smooth, dip each pretzel rod into the chocolate, ensuring it’s coated well.
3. Allow any excess chocolate to drip off before moving to the next step.
4. While the chocolate is still wet, sprinkle your choice of colorful sprinkles or crushed nuts over the chocolate-covered pretzel.
5. Place each decorated pretzel rod on a sheet of parchment paper to cool and harden.
6. Once the chocolate has set, transfer the pretzel rods to glass jars for an appealing presentation.
7. Serve immediately or store in an airtight container until you’re ready to enjoy!
This fun and easy prep will surely be a hit at your toddler’s birthday party!
Product Recommendations:
• Melting chocolate wafers
• colorful sprinkles assortment
• glass jars for serving
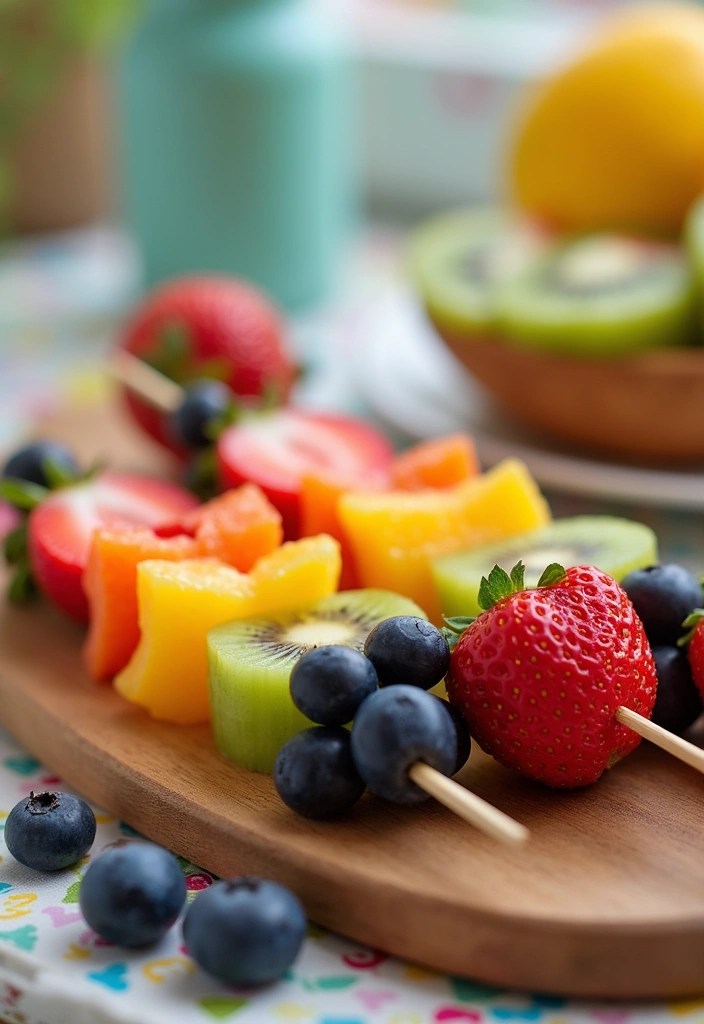
7. Fruit and Cheese Skewers
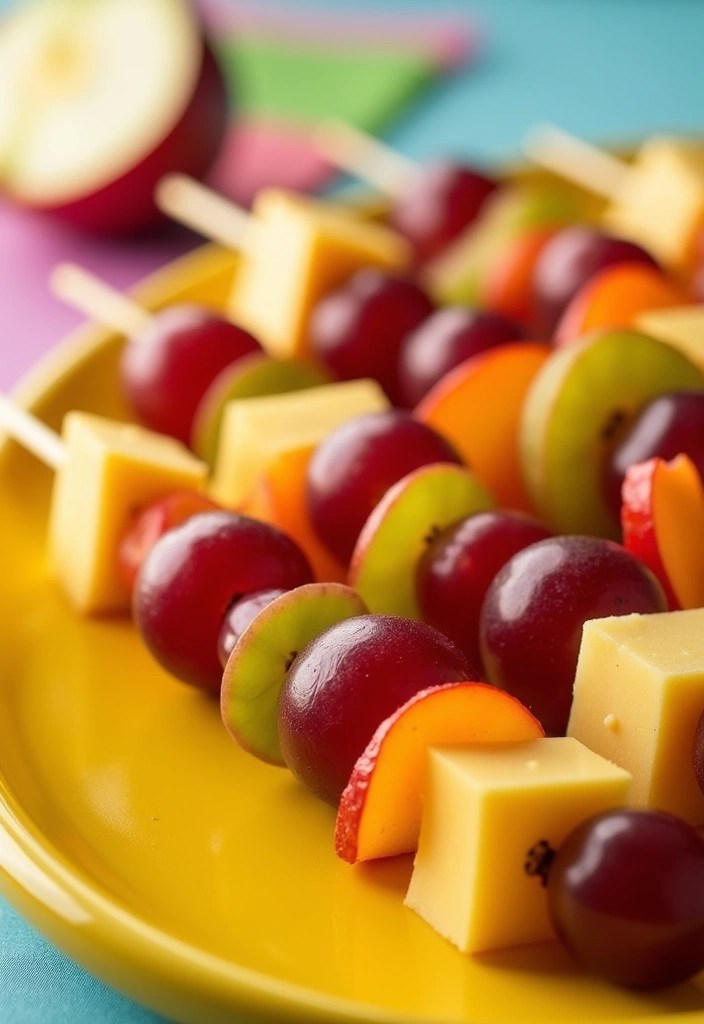
Fruit and cheese skewers are a delightful finger food that seamlessly blends sweet and savory flavors, making them an ideal choice for any toddler’s birthday celebration!
Start by using wooden skewers to assemble a vibrant mix of cheese cubes and a variety of fruits like grapes, apple slices, and strawberries. The colorful skewers are not only visually appealing but also easy for toddlers to grab, making snacking fun and interactive.
This tasty treat is not only delicious but also packed with essential nutrients, ensuring that both kids and parents will appreciate the healthy options at the party. Plus, you can serve them on colorful serving platters to enhance the festive atmosphere! Kids will love the fun texture of the cheese paired with the freshness of the fruit, making these skewers a guaranteed hit!
Ingredients:
– Wooden skewers
– 1 cup of cheese cubes (cheddar, mozzarella, or your toddler’s favorite)
– 1 cup of grapes (red or green)
– 1 cup of apple slices (peeled or unpeeled, as preferred)
– 1 cup of strawberries (hulled and halved)
– Optional: honey or yogurt for dipping
Instructions:
1. Gather all your ingredients and skewers on a clean workspace.
2. Start by threading a cheese cube onto the skewer, followed by a grape.
3. Next, add an apple slice and then another cheese cube.
4. Continue alternating between cheese and fruit until the skewer is filled, leaving some space at the bottom for easy handling.
5. Repeat the process with the remaining skewers until all ingredients are used.
6. Arrange the assembled skewers on colorful serving platters for a festive presentation.
7. If desired, serve with a side of honey or yogurt for dipping.
These fruit and cheese skewers are not just easy to make but also bring a vibrant touch to any DIY toddler birthday snacks table, ensuring a fun and tasty experience for everyone!
Product Recommendations:
• Wooden skewers
• colorful serving platters
• cheese cube container
8. Veggie Cups with Hummus
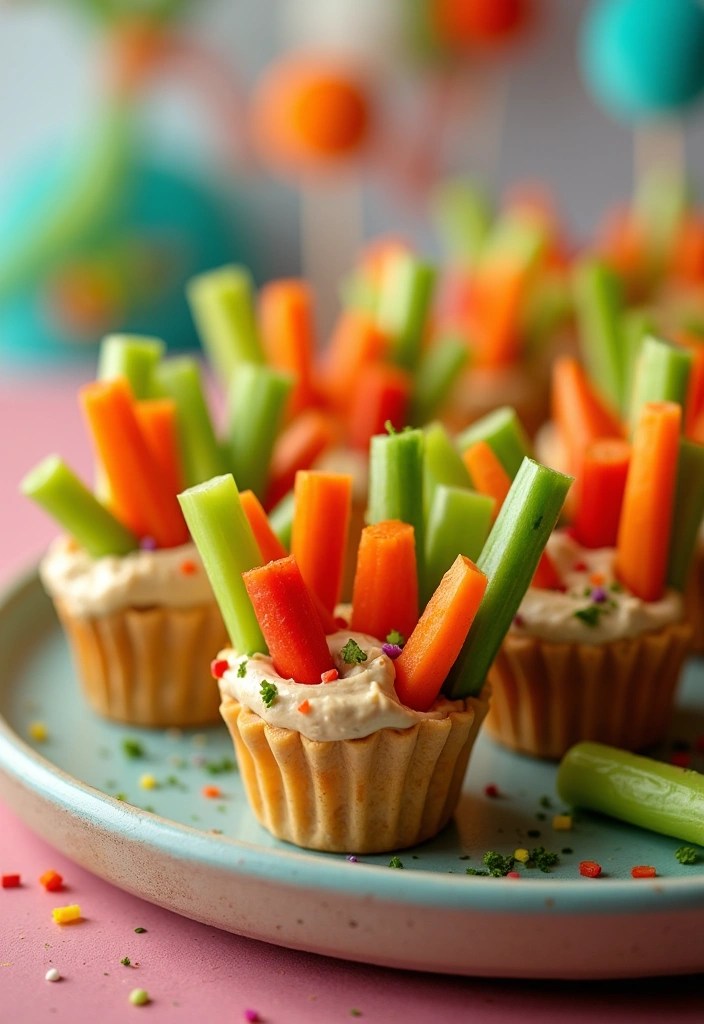
To create these colorful cups, fill small plastic cups with an assortment of vibrant veggies such as carrots, celery, bell peppers, and cucumbers. At the bottom of each cup, add a generous scoop of hummus for dipping.
This snack not only promotes healthy eating habits but also provides a fun, hands-on experience for toddlers. To make your presentation even more appealing, consider using colorful serving trays to display the cups. And don’t forget to equip the kids with kid-friendly utensils to make it easy for them to enjoy their snacks! The vibrant colors and crunchy textures are sure to be a hit at any birthday celebration!
Ingredients:
– 1 cup hummus (store-bought or homemade)
– 1 cup baby carrots, cut into sticks
– 1 cup celery sticks, cut into pieces
– 1 cup bell peppers (red, yellow, and green), sliced
– 1 cup cucumbers, sliced
– Small plastic cups
– Colorful serving trays (optional)
– Kid-friendly utensils (optional)
Instructions:
1. Start by washing and prepping all the vegetables. Cut them into sticks or bite-sized pieces for easy handling.
2. Take the small plastic cups and scoop a generous amount of hummus into the bottom of each cup.
3. Arrange the cut veggies in each cup, standing them upright for a colorful display.
4. If desired, place the filled cups on colorful serving trays to make them visually appealing.
5. Serve with kid-friendly utensils, making it easy for toddlers to dip and enjoy their veggie cups.
6. Enjoy watching the little ones happily munch away on this nutritious snack at your toddler’s birthday party!
Product Recommendations:
• Small plastic cups
• kid-friendly utensils
• colorful serving trays
9. Frozen Banana Pops
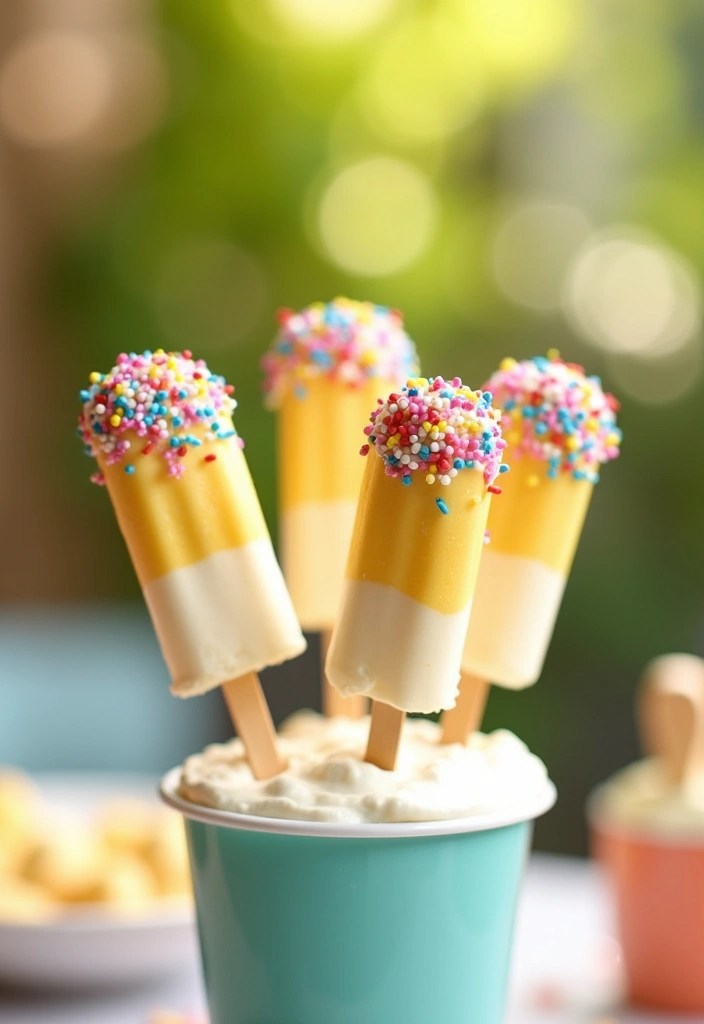
Frozen Banana Pops are a delightful and nutritious treat that’s ideal for any birthday celebration!
To create these refreshing snacks, simply slice up some bananas and dip them in yogurt, then freeze them on wooden popsicle sticks. For an extra touch of fun, roll the pops in crushed nuts or colorful sprinkles to make them even more appealing to the little ones.
These pops are not only simple to prepare but also provide a tasty way to beat the heat during warm-weather parties. Plus, using freezer-safe containers ensures that your treats stay fresh and ready for the kids to enjoy. They are bound to become a favorite among toddlers!
Ingredients:
– 2 ripe bananas
– 1 cup of yogurt (any flavor you prefer)
– 1/2 cup crushed nuts (optional)
– 1/2 cup colorful sprinkles (optional)
– Wooden popsicle sticks
– Freezer-safe containers
Instructions:
1. Peel the bananas and slice them into bite-sized pieces, roughly 1 inch thick.
2. Insert a wooden popsicle stick into each banana piece, making sure it goes in about halfway.
3. Dip each banana slice into the yogurt, ensuring it is fully coated.
4. Roll the yogurt-covered bananas in crushed nuts or colorful sprinkles if desired.
5. Place the coated banana pops on a parchment-lined baking sheet.
6. Transfer the baking sheet to the freezer and let the pops freeze for at least 2-3 hours, or until solid.
7. Once frozen, you can store the banana pops in freezer-safe containers for easy serving.
8. Serve the frozen banana pops at your toddler’s birthday party and watch the smiles light up!
These DIY toddler birthday snacks are a fun idea for any celebration, and the easy prep makes them a breeze to whip up. Enjoy!
Product Recommendations:
• Wooden popsicle sticks
• silicone ice pop molds
• colorful sprinkles.
10. DIY Trail Mix Bar
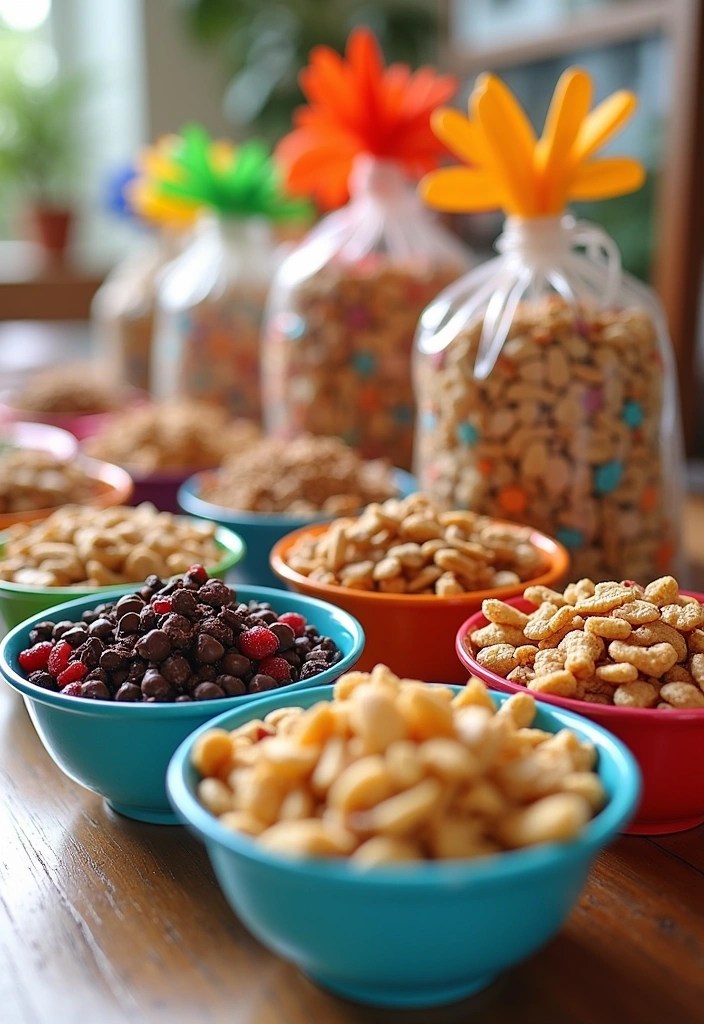
Set up an exciting DIY Trail Mix Bar for your toddler’s birthday party that will keep the little ones engaged and satisfied. This fun idea allows kids to customize their snacks, creating combinations that suit their tastes while having a blast. With a colorful array of ingredients, each child can mix their unique blend of flavors and textures to take home.
To make this interactive snack experience even more appealing, use decorative bowls to present the ingredients. Choose vibrant colors and fun shapes to brighten up the table, making it an inviting space for the kids to create their masterpieces.
Ingredients:
– Assorted Nuts (almonds, cashews, walnuts)
– Dried Fruits (raisins, cranberries, apricots)
– Chocolate Chips (milk, dark, or white)
– Cereals (Cheerios, rice puffs, or granola)
– Seeds (pumpkin seeds, sunflower seeds)
– Mini Pretzels
– Marshmallows (mini)
– Coconut Flakes
Instructions:
1. Gather Supplies: Collect all the ingredients and place them in separate decorative bowls. Make sure to have enough for each child to create their mix.
2. Set Up the Table: Arrange the bowls on a table with clear labels for each ingredient. You can also provide small scoops or spoons for easy serving.
3. Create a Base: Encourage the kids to start with a base of cereals or nuts. This will give their mix a good foundation.
4. Add Mix-Ins: Let them choose from dried fruits, chocolate chips, and seeds. Suggest combinations but allow them to have fun with their choices.
5. Finish with Fun: They can top off their mix with pretzels, mini marshmallows, or coconut flakes for added crunch and sweetness.
6. Pack to Go: Provide small bags or containers for the kids to take their creations home. You can even decorate the bags with stickers for a personal touch.
This DIY Trail Mix Bar not only makes for a tasty treat but also serves as a wonderful activity that kids will remember long after the party is over!
Product Recommendations:
• Decorative serving bowls
• Fun-shaped scoops
• Snack bags with colorful designs
11. Ice Cream Cone Fruit Cups
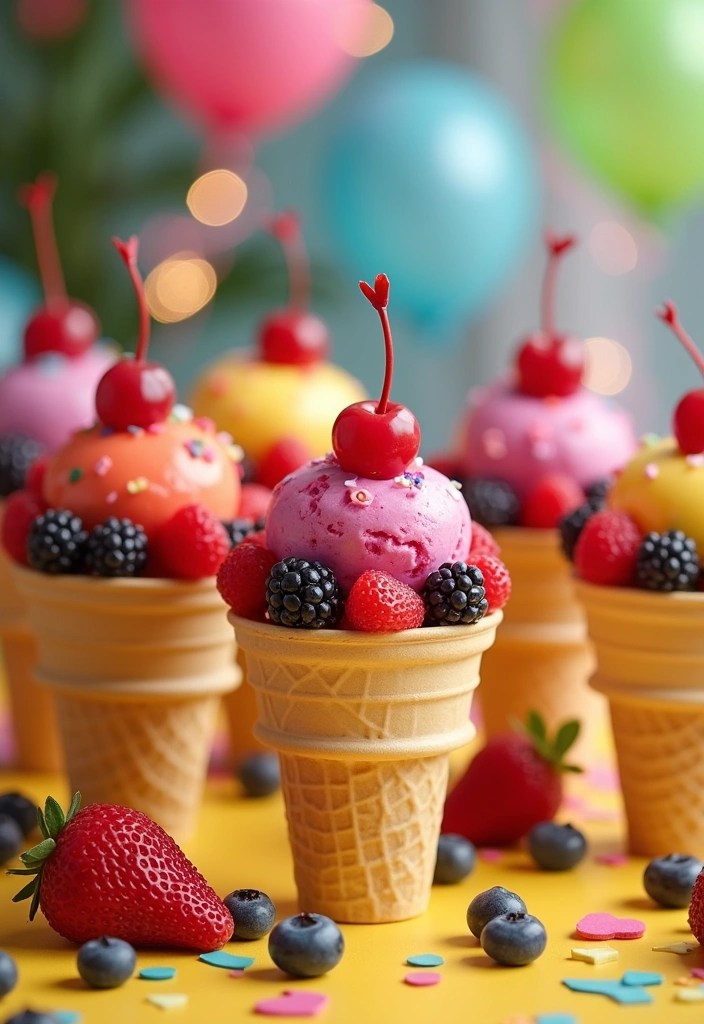
Ice Cream Cone Fruit Cups are a fun and whimsical way to serve fresh fruit at a birthday celebration!
To create these delightful snacks, simply fill waffle cones with a vibrant mix of colorful fruits like berries, melons, and grapes using assorted fruits. This playful presentation not only excites toddlers but also makes healthy eating much more appealing.
These fruit cups are not just adorable; they are also portable, allowing little ones to enjoy their snacks while mingling with friends. Enhance your party setup with decorative bowls for serving, kid-friendly utensils for easy eating, and festive tablecloths to complete the cheerful atmosphere!
Ingredients:
– Waffle cones
– Strawberries (sliced)
– Blueberries
– Raspberries
– Seedless grapes (halved)
– Cubed watermelon
– Cubed cantaloupe
– Optional: a drizzle of honey or yogurt for added flavor
Instructions:
1. Start by washing all the fruits thoroughly under running water.
2. Slice the strawberries and cube the watermelon and cantaloupe into bite-sized pieces.
3. In a large mixing bowl, combine all the prepared fruits: strawberries, blueberries, raspberries, grapes, watermelon, and cantaloupe.
4. If desired, drizzle a little honey or yogurt over the fruit mixture for added sweetness and flavor. Gently toss to coat.
5. Take the waffle cones and begin filling them with the fruit mixture, packing it in gently to ensure they hold together.
6. Arrange the filled cones on a decorative platter or in a sturdy container for easy transport.
7. Serve immediately, or refrigerate until you’re ready to enjoy the snacks at the party.
These Ice Cream Cone Fruit Cups are sure to be a hit at any toddler birthday party, making healthy snacking a fun and interactive experience!
Product Recommendations:
• Waffle cones
• assorted fruit cutters
• colorful serving platters
12. Peanut Butter and Banana Roll-Ups
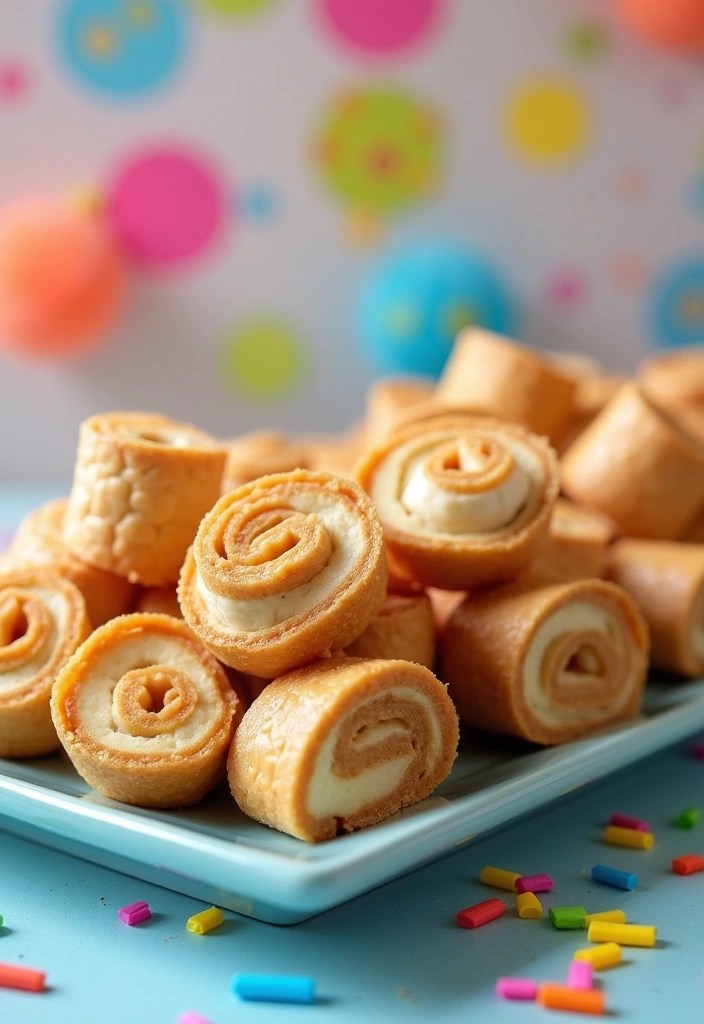
Peanut Butter and Banana Roll-Ups are a delightful and easy-to-make snack that kids will absolutely love!
To create this tasty treat, simply spread peanut butter on a whole wheat tortilla, place a fresh banana in the center, and roll it up tightly. Once you have your roll, slice it into pinwheels for easy snacking.
This fun and nutritious snack not only tastes great but also offers a healthy combination of protein and carbs for lasting energy. Plus, it’s quick to prepare in just a few minutes, making it the perfect option for those busy party days! For added convenience, consider using a kid-friendly cutting board and serving your roll-ups on colorful serving platters to make snack time even more enjoyable!
Ingredients:
– 1 whole wheat tortilla
– 2 tablespoons peanut butter
– 1 ripe banana
Instructions:
1. Start with a clean surface and lay the whole wheat tortilla flat.
2. Spread 2 tablespoons of peanut butter evenly over the entire surface of the tortilla.
3. Place the ripe banana in the center of the tortilla.
4. Roll the tortilla tightly around the banana, making sure it’s secure.
5. Using a kid-friendly cutting board, slice the roll into pinwheel shapes.
6. Arrange the pinwheels on colorful serving platters for a fun presentation.
7. Serve immediately and enjoy this delightful snack with your little ones!
Product Recommendations:
• Whole Wheat Tortillas
• Natural Peanut Butter
• Kid-Friendly Cutting Board
13. Savory Cheese and Veggie Muffins

You can whip up a batch with minimal effort, making them an ideal choice for busy parents. Plus, they can be made in large quantities and frozen for later use. Just remember to let them cool properly on a rack before serving.
Ingredients:
– 1 cup shredded cheese (cheddar, mozzarella, or your favorite)
– 1 cup diced mixed veggies (bell peppers, spinach, carrots, etc.)
– 2 cups all-purpose flour
– 1 tablespoon baking powder
– ½ teaspoon salt
– 1 cup milk
– 2 large eggs
– ¼ cup vegetable oil or melted butter
– Optional: herbs or spices for added flavor (like oregano or garlic powder)
Instructions:
1. Preheat your oven to 375°F (190°C) and grease a sturdy muffin tin or line it with muffin liners.
2. In a large mixing bowl, combine the flour, baking powder, and salt. Whisk together until well blended.
3. In another bowl, beat the eggs and then add the milk and vegetable oil (or melted butter). Mix until combined.
4. Pour the wet ingredients into the dry ingredients and stir until just combined. Be careful not to overmix.
5. Gently fold in the shredded cheese and diced veggies until evenly distributed throughout the batter.
6. Spoon the batter into the prepared muffin tin, filling each cup about ¾ full.
7. Bake for 18-20 minutes, or until the muffins are golden brown and a toothpick inserted into the center comes out clean.
8. Once baked, remove the muffins from the oven and let them cool on a cooling rack for a few minutes before serving.
These Savory Cheese and Veggie Muffins are not only a fun idea for DIY toddler birthday snacks but also a tasty way to introduce more veggies into your little one’s diet! Enjoy the smiles as they munch on these delicious treats.
Product Recommendations:
• Silicone muffin pan
• colorful cupcake liners
14. Colorful Gelatin Cups
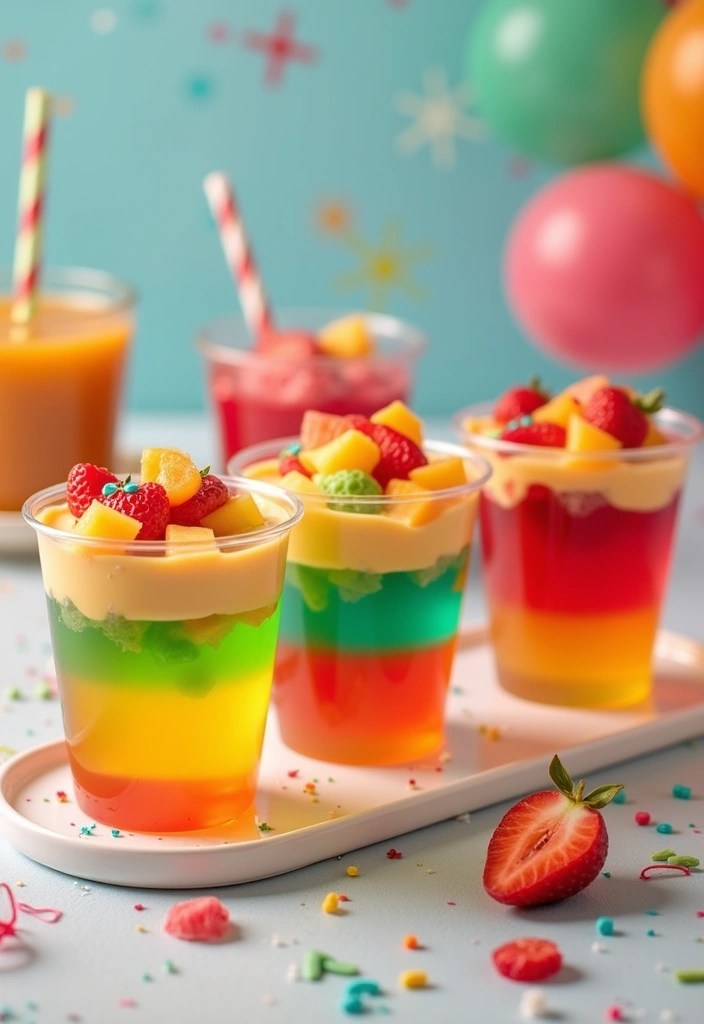
Colorful Gelatin Cups are an exciting and wobbly treat that will have kids giggling with sheer delight! To create this fun snack, prepare various flavors of gelatin and layer them beautifully in clear plastic cups for a stunning rainbow effect. For added flavor and a touch of nutrition, feel free to mix in some assorted fruit pieces. These cups are not only visually appealing but also serve as a refreshing snack on those warm, sunny days. Get the kids involved in the layering process for a fun and interactive experience that’s sure to be a hit at the party!
Ingredients:
– 3 different flavors of gelatin (e.g., strawberry, orange, lime)
– 3 cups of boiling water (1 cup for each flavor)
– 3 cups of cold water (1 cup for each flavor)
– Assorted fruit pieces (e.g., diced strawberries, blueberries, kiwi)
– Clear plastic cups
– Colorful serving spoons
Instructions:
1. Prepare Gelatin: In separate mixing bowls, dissolve each flavor of gelatin in 1 cup of boiling water. Stir until completely dissolved.
2. Add Cold Water: Once dissolved, add 1 cup of cold water to each bowl and mix well.
3. Layer the Gelatin: Pour the first flavor into the clear plastic cups, filling them about one-third full. Place them in the refrigerator and let them set for about 30-45 minutes.
4. Add Fruit (Optional): Once the first layer is set, add a layer of assorted fruit pieces on top of the gelatin.
5. Repeat Layers: Pour the second flavor of gelatin over the fruit layer, filling the cup about two-thirds full. Return to the refrigerator and let set for another 30-45 minutes.
6. Final Layer: After the second layer is set, add more fruit if desired, then pour the final gelatin flavor on top. Allow the cups to set completely in the refrigerator for at least 2 hours.
7. Serve and Enjoy: Once all layers are set, serve the colorful gelatin cups with colorful serving spoons.
These delightful cups are sure to be a hit at any toddler birthday party, offering a fun and tasty way to celebrate!
Product Recommendations:
• Clear plastic cups
• colorful serving spoons
• assorted fruit cutters
Conclusion

These 14 DIY toddler birthday snacks are sure to make your celebration a delicious success!
Creating fun and interactive snacks helps engage the little ones while providing them with tasty and nutritious options.
So roll up your sleeves, get creative, and enjoy the process of making these delightful treats that will leave lasting memories for both you and your guests!
Note: We aim to provide accurate product links, but some may occasionally expire or become unavailable. If this happens, please search directly on Amazon for the product or a suitable alternative.
This post contains Amazon affiliate links, meaning I may earn a small commission if you purchase through my links, at no extra cost to you.

Leave a comment